Homemade Hot Cocoa Mix and Minty Marshmallow Recipes
As much as I hate to admit it, winter is really and truly here. The positive side of that, however, is that it's time for hot cocoa and marshmallows!
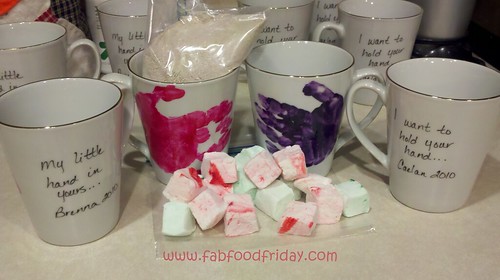
This year I made hot cocoa mix from a recipe my mom used when I was a kid and tried my hand at making marshmallows. It all turned out so nicely that we gave homemade cocoa and minty marshmallows as teacher gifts this year!
Hot Cocoa Recipe
The cocoa recipe is quite easy and makes a lot of mix. If you store it in a airtight container it will keep for 6 months.
Ingredients
10 cups nonfat dry milk powder
1 can (15 ounces) instant chocolate drink mix (the kind used to make chocolate milk; not hot cocoa mix)
1-1/3 cups powdered nondairy creamer
2 cups confectioners' sugar
Directions
In an airtight container, combine all ingredients. A tip for mixing ingredients: Use a large plastic tub with a lid (an old ice cream bucket works well). Put in about half the powdered milk, half the cocoa mix and half the powdered sugar. Then add the creamer and layer the rest of the ingredients on. Tightly attach the lid and rotate the container to mix.
Yield: 13 cups mix (about 41 servings).
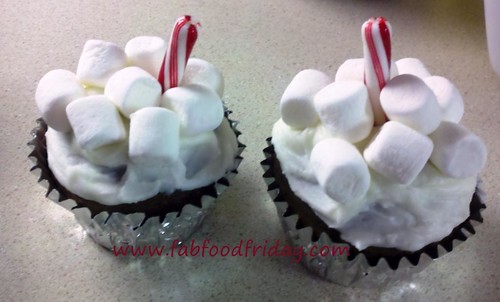
Minty Marshmallow Recipe
This recipe came to me as a part of the Betty Crocker Holiday Trends. I made just a couple changes...
These are so much better than purchased marshmallows! Just skip the mint if you're not a fan.
Ingredients
Butter
1/3 cup powdered sugar
1/2 cup cold water
2 1/2 tablespoons unflavored gelatin
1 1/2 cups granulated sugar
1 cup corn syrup
1/4 teaspoon salt
1/2 cup water
1 teaspoon peppermint extract
8 to 10 drops red or green food color
Directions
1. Generously grease bottom and sides of 11x7-inch (2-quart) glass baking dish with butter; sprinkle with 2 tablespoons of the powdered sugar (I used more to help with the stickiness). Pour 1/2 cup cold water into bowl of heavy-duty mixer fitted with paddle or whisk attachment. Sprinkle gelatin over water; set aside. (Handy tip: if you buy Knox gelatin in packets, each packet is 1Tbsp.)
2. In 2-quart heavy saucepan, heat granulated sugar, corn syrup, salt and 1/2 cup water over low heat, stirring constantly, until sugar is dissolved. Increase heat to medium-low and heat syrup to boiling. Boil without stirring until syrup reaches 240°F on candy thermometer, about 15 to 20 minutes; remove from heat.
3. With mixer running at low speed, slowly pour hot syrup into gelatin mixture in thin stream down side of bowl (avoid pouring syrup onto paddle or whisk, as it may splash). Gradually increase speed to medium-high; beat until mixture is white and has almost tripled in volume, about 8 to 10 minutes. Add peppermint extract and beat to blend, about 30 seconds longer. Randomly drop four drops of red or green food color into marshmallow mixture in bowl; fold 3 to 4 times to swirl color.
4. Pour into baking dish. Smooth top with damp rubber spatula. Drop red or green food color randomly on top of marshmallow mixture. Using toothpick, pull food color through marshmallow mixture to create swirl pattern over top. Let stand uncovered at least 4 hours.
5. Sprinkle cutting board with about 1 tablespoon of the powdered sugar (again, I used more. I also sprinkled the top of the marshmallows with powdered sugar before removing them from the dish). Place remaining powdered sugar in small bowl. To remove marshmallow mixture, loosen sides from dish, and gently lift in one piece onto cutting board. Spray sharp knife with cooking spray (I found it worked better if I didn't use cooking spray, but dusted my knife with powdered sugar). Cut marshmallows into 1-inch squares (11 rows by 7 rows). Dust bottom and sides of each marshmallow by dipping into bowl of powdered sugar (I tossed marshmallows in the dish, rolled them in the sugar and then rolled them in my hands to dust off the extra sugar. This kept the marshmallows from sticking together in the container). Store in airtight container at room temperature up to 3 weeks.
About the cups
I found a dozen plain white cups at Walmart for $9. At Michael's I purchased Porcelain 150 paints and fine point marker. I brushed my girls hands with the paints and had them grip the cups. After those dried for 24 hours I added the text. After another day of drying I baked the cups for 35 minutes. They are dishwasher safe and the girls grandparents have a thoughtful gift.