Showing posts with label Dinner. Show all posts

Friday, June 3, 2011

Pasta with Chicken Sausage and Broccoli

Pasta is easy- we have it, in some form, once a week. I love this recipe because it takes the ease of pasta and “upgrades” it with sausage and a vegetable. My girls love this.


Of course you can switch things out… I usually use half a ring of turkey kielbasa instead of the chicken sausage and you could easily use a different vegetable.

I found this recipe in Real Simple magazine.


Serves 4 Total Time: 20m

Ingredients
* 12 ounces rigatoni (about 4 1/2 cups) (I use what I have on hand)
* 1 tablespoon olive oil
* 1 onion, sliced (I use dried chopped onion, about 2T)
* 6 ounces fully cooked chicken sausage links, sliced (I use turkey kielbasa, sliced and browned for a couple minutes in a skillet)
* 1 small head broccoli, cut into florets and stems sliced
* 1/4 cup grated Parmesan (1 ounce)

Directions
1. Cook the pasta according to the package directions.

2. Meanwhile, heat the oil in a large skillet over medium-high heat. Cook the onion, stirring often, for 3 minutes. Add the sausage and cook, stirring, until browned, 2 to 3 minutes. Add the broccoli and 1¼ cups water and simmer, covered, until the broccoli is tender, 5 to 6 minutes.

3. Toss the pasta with the sausage mixture and any remaining liquid and the Parmesan.

Friday, May 20, 2011

Meatless Quesadillas Two Ways

Quesadillas are a quick & easy meal in our house. Often it’s leftover meat and a bit of cheese between tortillas. Or just cheese if the girls are feeling finicky.

Either way they take only a few minutes to make and are a fun change from sandwiches.
When I want to get a bit fancier I turn to this terrific shrimp quesadillas recipe from Good Housekeeping. It’s quick, delicious and a great way to be meatless but still have the texture that most people expect with a meal. My girls gobbled this up!


Ingredients (serves 4)
* 1 pound(s) shelled and deveined shrimp, coarsely chopped
* 1/4 teaspoon(s) ground chipotle chile
* 2 limes
* 1 tablespoon(s) olive oil
* 1 large (8 to 10 ounces) red pepper, chopped (I omitted this)
* 1 medium (6 to 8 ounces) onion, chopped (I use chopped onion flakes, about 2T)
* 1 ripe avocado, mashed
* 1/2 cup(s) loosely packed fresh cilantro leaves, chopped (I use Gourmet Garden Cilantro Herb blend)
* Pepper
* 2 medium ripe tomatoes, chopped
* 1/2 serrano chile, seeded and finely chopped
* 8 (8-inch) soft-taco-size flour tortillas
* 8 ounce(s) shredded reduced-fat Mexican cheese blend
* 2 cup(s) shredded romaine lettuce


Directions
1. In small bowl, toss shrimp with chipotle chile. From limes, squeeze 4 tablespoons juice; set aside.

2. In nonstick 12-inch skillet, heat oil on medium one minute. Add red pepper and onion and cook 10 minutes or until tender, stirring frequently. Add shrimp and cook 3 minutes longer or until shrimp just turn opaque throughout. Transfer shrimp mixture to medium bowl and cover loosely with foil to keep warm. Remove pan from heat and wipe with paper towel.

3. Meanwhile, prepare guacamole: In small bowl, combine avocado with 2 tablespoons lime juice, half of cilantro, and 1/2 teaspoon freshly ground black pepper. Prepare tomato salsa: In another small bowl, combine tomatoes, serrano chile, 1/8 teaspoon freshly ground black pepper, and remaining lime juice.

4. Heat same skillet on medium-low 30 seconds. Place 1 tortilla in skillet. Sprinkle with one-fourth of shrimp mixture, one-fourth of cheese, and one-fourth of remaining cilantro; top with second tortilla, pressing lightly. Cook quesadilla about 2 minutes or until lightly toasted. Carefully turn quesadilla and cook 1 to 2 minutes longer or until cheese melts. Repeat to make 4 quesadillas in total.

5. Cut quesadillas into wedges; serve with guacamole, tomato salsa, and shredded romaine.

Another Meatless Recipe

I have friends who are vegetarian. Some consider seafood to be meat, some don’t. This recipe for Bean & Cheese Quesadillas from Family Circle is also quick, delicious and uses black beans for texture and protein.

Ingredients (serves 6)
* 1 tablespoon olive oil
* 1 small onion, finely chopped
* 1/2 small green pepper, seeded and chopped (I omit this)
* 1 can (15 ounces) black beans, drained and lightly mashed
* 1/2 cup salsa
* 1/2 teaspoon chili powder
* 1 package (10 count) fajita-size flour or whole-wheat tortillas
* 8 ounces reduced-fat pepper Jack cheese, shredded
* 1/2 cup cilantro leaves
* Extra salsa for serving (optional)

Directions
1. Heat oil in a large nonstick skillet over medium-high heat. Add onion and green pepper and cook for 4 minutes, stirring occasionally. Stir in beans, salsa and chili powder. Cook for 3 minutes, stirring occasionally.

2. Spray a large nonstick skillet with cooking spray. Place over medium-high heat. Place one tortilla in the skillet and cook for 1 minute. Spread 1/3 cup of the bean mixture and 1/3 cup of the cheese evenly over the tortilla. Sprinkle some of the cilantro over the top. Place another tortilla on top and cook 1 minute. Press gently with a spatula and turn. Cook for 1 minute or until browned.

3. Place quesadilla on a baking sheet and keep warm in 200° oven. Repeat with the remaining ingredients to make four additional quesadillas. Allow skillet to cool slightly if it becomes too hot.

4. To serve, cut each quesadilla into quarters. Serve 3 quarters to each person (there will be 2 leftover wedges)

Friday, April 15, 2011

Buttery Dinner Rolls

I’ve never been able to make a pretty dinner roll. I can remember my mom making rolls; perfectly round and golden. When I try they look lumpy and ugly (though they taste fine). I made this recipe at Thanksgiving and, for the first time, served beautiful rolls. We're making them again for Easter dinner!

Brenna helped me make these as it involved rolling the dough into balls. Fun!
The recipe came from the April 2009 Cuisine at Home magazine.

Buttery Dinner Rolls


Recipe makes 12 rolls. Warning: this is time consuming! Takes about 4 hours; 3 1/2 of it is rising time.

Ingredients
2/3 c whole milk
1/2 stick unsalted butter, diced
1/4 c sugar
1 pkg active dry yeast (2 1/4 tsp)
2 T unsalted butter, softened
3 c all-purpose flour
1 t table salt
1 egg, beaten
1 egg yolk, beaten

Directions
Heat milk in a small saucepan to 180° over mdium heat. Add 1/2 stick butter and sugar; stir to dissolve sugar. Cool mixture to 110°. Stir in yeast. Let rest in a warm place until it swells and becomes bubbly; about 10 minutes.

Grease inside of a bowl and a muffin tin with 2 T softened butter.

Whisk together flour and salt in the bowl of a stand mixer. Add yeast mixture, egg and egg yolk.
Knead mixture with a dough hook on medium speed until dough forms a ball and pulls away from the bowl; about 6-8 minutes. Add 1 T flour at a time if necessary. Place dough in buttered bowl and let rise until doubled in size; about 2 hours.

Divide dough into 36 equal portions. Shape portions into balls; place 3 each into each well of muffin tin. Cover dough with plastic wrap. (Dough may be refrigerated overnight at this point.) Let rise until doubled in size; about 1 1/2 hours (2 1/2 hours if dough was chilled).

Preheat oven to 375° with rack in lower third of oven.

Bake rolls until light brown; about 10 minutes. Cool slightly in pan before removing.

Handy tip: my kitchen tends to be cool. I heat my oven on a low setting while I mix the dough and turn it off when it becomes warm. I place my dough, covered, in here to rise. Don’t make the oven too warm.

Friday, April 8, 2011

Squash Ravioli with Herbed Butter Sauce

I have never been a fan of squash. Well, except for pumpkin. I love pumpkin. But, whatever the reason, I never liked squash. I suppose I can just blame my mom… Maybe I just didn’t like the way she prepared it. (That’s a joke, mom!)


Anyway… Like everyone else I am trying to save money and eat a bit healthier. So when I found this recipe in the November Family Fun magazine I decided to try it- in spite of the fact that it used butternut squash.

And it was really, really good! The grated Parmesan mixed so nicely with the squash. And the nutmeg gave it a nice boost. I served this as a main dish with a side salad but it would be a great side dish, too. My girls helped with the pasta and proclaimed it yummy. Not sure if they liked it because they helped to make it or if they thought it was pumpkin ravioli (I’m not beyond a bit of trickery!)

Squash Ravioli with Herbed Butter Sauce

For the filling
2 cups butternut squash, rind removed, cut into 1-inch cubes
1 tablespoon milk
1/2 cup freshly grated Parmesan cheese, plus more for sprinkling
1/8 teaspoon freshly grated nutmeg

For Pasta
2 cups flour
1/2 teaspoon salt
3 large eggs

For the sauce
8 tablespoons butter
12-16 fresh sage leaves, thinly sliced

1. Make the filling. Heat the oven to 350 degrees. Arrange the squash on a foil-lined baking sheet and roast it until tender when peirced with a fork, about 30 minutes. Allow the squash to cool for about 5 minutes, then transfer it to a medium-size bowl. Blend the squash with the milk, cheese, and nutmeg until it has a smooth, mashed potato-like consistancy. Note: the squash can be prepared a day in advance and refrigerated in an airtight container. (for an easier way to prepare the squash see below)
2. Make the pasta. On a clean work surface, mound the flour and make a well in the center. In a small bowl use a fork to lightly beat together the salt and the eggs. Carefully pour the egg mixture into the well. Using a fork, gently incorporate the flour into the egg mixture, a small amount at a time. With your hands and a spatula or dough scraper, work the dough until it pulls together into a smooth, pliable ball. (Note: make the pasta this way. I tried it in my mixer with a bread hook and it didn’t work as well.)
3. Halve the dough, then form each peice into a 1/2inch thick disk. Cover the disks with plastc wrap and set them aside to rest at room tempature for 30 minutes.
4. Lightly flour your work surface and half each dough disk. Roll out one of your dough portions as thinly as you can (to about the thickness of a dime), then use a 2 1/2 inch- diameter drinking glass, biscuit cutter, or cookie cutter to cut rounds from the dough. arrange them in pairs. Each half disk should yield 7 pairs of dough rounds.
5. Further thin the dough rounds by pinching them between your thumb and forefinger. each round should increase in diameter by about 1/4 inch.
6. Use a pair of dough rounds to make each ravioli. With a pastry brush or your fingertips dipped in water, paint a half inch perimeter around one of the dough rounds. Spoon a 1/2 tablespoon of squash filling into the center, then press the other round ontop of it along the moistened edges. Use the tines of a fork to seal the edges.
7. Bring two large pots of water to boil (using two pots allows all the pasta to cook at once). Meanwhile , make the sauce. Melt the butter in a sauce pan over medium-high heat. Add the sage and continue to cook the sauce until it’s light brown and has a nutty aroma, about 4 minuts. Remove the sauce from the heat.
8. Line a large plate with paper towels. Add half the ravioli to each pot of boiling water. The pasta will float to the top after 2 or 3 minutes, but continue cooking it until tender, about 15 more minutes ( take one out and test its tenderness before draining an entire batch). When the ravioli are done, use a slotted spoon or spatula to scoop them out and transfer them to paper towels to drain. (I placed them individually into a strainer, this seemed like a huge waste of paper towels.)
9. To serve, place the ravioli on individual plates and drizzle them with a spoonful of the Herbed Butter Sauce. Sprinkle with Parmesan if desired.

Option for preparing squash: split in half and remove seeds. Place cut side down on foil lined baking sheet and bake at 350 for 35-45 minutes; until tender. Remove from oven and let cool. Scrape squash out of rinds. Use 2 cups for this recipe. Remaining squash can be frozen for 3 months or used in other recipes.

Sunday, January 23, 2011

Fish & Hush Puppy Skillet

The minute I saw this recipe in the latest issue of Cuisine magazine I knew I would be making it. I love that it utilizes one of my favorite cooking tools: a cast iron skillet!


This is a very easy recipe to put together and is a bit lighter than traditional fish and hush puppies since it's not deep fried. The recipe calls for catfish, but I personally prefer cod, so will be making it with that fish in the future. This recipe will definitely be making a return trip to our table!

Fish & Hush Puppy Skillet


Ingredients

2 c self rising cornmeal mix (I used Jiffy corn muffin mix)
1/4 c scallions
1 red jalapeño, seeded & minced
2 tsp garlic
1/2 tsp table salt
1/2 tsp black pepper
3/4 c lager beer
1/2 c buttermilk
1 egg
1/4 c canola oil
2 catfish fillets (8 oz each) cut into 2" pieces
1/2 c fish fry mix (note: get one that is cornmeal based and used for dredging rather than batter frying)
1/2 c ketchup
1/3 c mayonaise
1 T dill pickle relish
1/2 tsp prepared horseradish

Directions

Preheat oven to 450 degrees F.

Mix cornmeal mix, scallions, jalapeño, garlic, salt and pepper in a bowl. Whisk beer, buttermilk and egg together; stir into cornmeal mixture and set aside.

Heat oil in 10 inch cast iron skillet until it shimmers.

Dredge fish in fish-fry mix, then fry in hot oil, on only one side, for 2 minutes.

Pour hush puppy batter over fish in skillet. Transfer skillet to oven and bake until golden and an inserted toothpick comes out clean- about 15 minutes. Remove and let rest 5 minutes. Loosen edges with a knife then top skillet with serving plate and flip both plate and skillet- carefully as skillet is still hot!

Whisk together ketchup, mayonnaise, relish and horseradish in a bowl for sauce.

Serve with coleslaw (of course).

Tuesday, January 4, 2011

Cinch! Conquer Cravings, Drop Pounds & Lose Inches by Cynthia Sass - A Review

I spent the final days of 2010 on a diet. Completely crazy, I know, but I figured if it worked and I began 2011 a few pounds lighter I might just be able to continue in 2011 during the "resolution breaking phase".


The plan I chose is a new one by Cynthia Sass M.P.H., R.D. called Cinch! I was given the book as a review and, after reading it, enjoying the conversational tone Sass uses to convey her message, and appreciating that she explained why she chose the foods for the diet (always good to know why you are eating what you are eating) I jumped in with both feet and did the 5 Day Fast Forward plan; a "jump start" to weight loss.

The 5 Day Fast Forward


The 5 Day Fast Forward is stringent, to say the least. It consists of 5 foods, prepared 4 ways, eaten on a schedule, for 5 days. By day 5 I was terribly sick of them- but I had lost 6 pounds.

What was more amazing to me, though, was that I had no desire for the party fare served at a New Year's Eve party I attended the evening before the Fast Forward ended. I had one drink, and ate a couple of appetizers the hostess had made. But I had no desire to sample everything, or keep grazing. And that, my friends, is HUGE!

The Cinch! Core Plan

Another aspect I appreciated was that the option was open for you to skip the Fast Forward if it was just too stringent and move on the the Core Plan. This 25 day plan (30 if you skip the Fast Forward) gives you options for 4 meals, by now your body has a schedule, plus one dark chocolate indulgence per day.

The menu items are easy to prepare, easy to plan ahead, and follow a "5 piece puzzle" of produce, whole grain, lean protein, plant based fat and specific spices. Learning this 5 piece puzzle will help keep you on track after the core plan ends.

Final chapters of the book discuss emotional eating, walking as exercise, and living the plan.

Pros and Cons

The Cinch! plan includes no red meat. As a Midwest girl, this is a bit painful as we have a deep freeze filled with beef and pork. But I understand the logic and plan to cut my family's red meat intake to 2 meals per week.

The cost of preparing a separate meal for myself and another for my family has been a bit daunting to work into our tight budget (raspberries are expensive in the dead of winter!) but now that I have worked through the Fast Forward I am able to buy whole foods and create menus for my family that use the same ingredients as my meals.

Certain organic foods are suggested- and Sass gives her reasons for choosing them. I truly appreciate that she says not to use organic if it doesn't fit into your budget or you just don't want to. Organic is not a deal breaker.

Vegan and vegetarian options are also given, making this a plan suited to anyone. If weight loss and healthy eating are part of your plan for 2011 I highly recommend Cinch! by Cynthia Sass.


Disclosure: I was provided a proof copy of Cinch! to review. Images and thoughts are completely mine and were not suggested or compensated.

Friday, December 3, 2010

Spicy Pumpkin Soup

Soups are a wonderful meal on a cold winter evening. This recipe, from Hungry Girl, is my new favorite. It's warm, low cal and filling! I mix 1T fat free sour cream into mine to add a creaminess, while my husband and daughters prefers theirs sprinkled with cheese. I serve it with half a slice of Irish Brown Bread.

Spicy Pumpkin Soup


Ingredients:
Non-stick cooking spray
1 tbsp minced garlic
1 tbsp chili powder
1/2 tsp cumin
4 cups Fat Free broth (chicken or vegetable)
15 oz. can pure pumpkin
1 can black beans, drained and rinsed
1 cup corn
3/4 cup salsa (this is where you can add or reduce the spiciness)
Optional toppings: shredded reduced-fat or fat-free cheese, and reduced-fat or fat free sour cream

Directions:
Spray pot with non-stick cooking spray and heat pan on medium. (Tip: use a larger pot than you think you'll need) Add garlic, chili powder and cumin, and stir for one minute. Add broth to the spices, and bring to a simmer. Add pumpkin and mix well. Add the remaining ingredients and bring soup to a boil. Reduce heat and simmer for 10 minutes. This soup can be served with a sprinkle of cheese and a little fat free sour cream on top. Serves 4.

(calories: 162.5, fat: 0.75g, sodium: 1128mg, carbs: 13, fiber: 12g, sugars: 6.5g, protein: 10g = 3 Points)

Sunday, June 20, 2010

Beef and Spinach Lasagna

Summer always makes life hectic and all the rain we've been experiencing brings its own set of problems. And when I'm stressed or short on sleep - or both- I crave comfort food.

Lasagna is one of those foods that just makes you feel warm and full and happy. This recipe- another one from the Taste of Home Comfort Food Diet Cookbook- takes the greatness of lasagna and makes it lower in fat and calories by adding spinach.

My girls ate this with nary a complaint. And I loved that it reheated well for lunch the next day and "leftover night" a few days later.

Beef and Spinach Lasagna


Ingredients

* 1 pound lean ground beef (or lighten it up further with ground turkey)
* 1 medium onion, chopped
* 2 jars (26 ounces each) meatless spaghetti sauce
* 4 garlic cloves, minced
* 1 teaspoon dried basil
* 1 teaspoon dried oregano
* 1 package (10 ounces) frozen chopped spinach, thawed and squeezed dry
* 2 cups ricotta cheese
* 2 cups (8 ounces) shredded part-skim mozzarella cheese, divided
* 9 no-cook lasagna noodles (or cook wheat noodles; it works just as well)

Directions

*If you opt to cook your noodles, begin with that and let them cool while you follow the rest of the steps.
* In a large skillet, cook beef and onion over medium heat until meat is no longer pink; drain. Stir in the spaghetti sauce, garlic, basil and oregano. Bring to a boil. Reduce heat; cover and simmer for 10 minutes. In a large bowl, combine the spinach, ricotta and 1 cup mozzarella cheese until combined.
* Spread 1-1/2 cups meat sauce into a greased 13-in. x 9-in. baking dish. Top with three noodles. Spread 1-1/2 cups sauce to edges of noodles. Top with half of the spinach mixture. Repeat layers. Top with remaining noodles, sauce and remaining mozzarella cheese.
* Cover and bake at 375° for 30 minutes. Uncover; bake 10-15 minutes longer or until bubbly. Let stand for 10 minutes before cutting. Yield: 12 servings.


Nutrition Facts: 1 piece (prepared with lean ground beef) equals 281 calories, 11 g fat (6 g saturated fat), 50 mg cholesterol, 702 mg sodium, 26 g carbohydrate, 3 g fiber, 20 g protein.

Disclosure: I am an Amazon affiliate. If you purchase this cookbook using the links in this post I may earn a small (very small) amount of money.

Thursday, May 27, 2010

Apricot Beef Stir Fry

I'm making an effort to have my family eat better and add more vegetables to our diet. Since Chinese food is always a big hit in our house I thought this recipe would be a hit- and it was! Because it uses frozen stir-fry vegetables it's quick, too! I've made this a couple of times now and it gets a big thumbs up from my girls. The leftovers also reheat really nicely for lunch the next day.

Recipe from Taste of Home Comfort Food Diet Cookbook.

Apricot Beef Stir Fry

Ingredients

1 t cornstarch
1/4 c cold water
1/2 c apricot preserves
2 T reduced sodium soy sauce
1/2 t minced garlic (though I used more as we like garlic!)
1/4 t salt
1/4 t crushed red pepper flakes
1 lb boneless beef sirloin steak, sliced thin
1 T canola oil
1 pkg (16 oz) frozen asparagus stir fry vegetable blend

Directions

In a small bowl whisk cornstarch and cold water until smooth. Stir in preserves, soy sauce, garlic, salt & red pepper flakes. Set aside.

In a large skillet or wok stir fry beef in oil until no longer pink. Remove and keep warm. In the same pan stir fry vegetables according to package directions. Return beef to pan. Stir apricot mixture and add to beef mixture. Cook and stir until slightly thickened. Serve over rice.

1 c of beef mixture is 309 calories (not including rice)


Disclosure: I am an Amazon.com affiliate so if 10 of you click on the link and buy the book I may make enough money to buy another bag of frozen stir fry vegetables!

Friday, May 21, 2010

Lime Chicken Tacos

I've been trying to eat healthier. Really, I have. But sometimes you really just want "comfort food"- good, filling food that doesn't scream "DIET!" I've been trying recipes from the Taste of Home Comfort Food Diet Cookbook for a while now and this is one of my favorites.

Not only is it great for tacos, but it makes a nice chicken taco salad and chicken nachos. It reheats nicely for lunch the next day and, because it's cooked in the slow cooker I classify it as quick and easy. The entire family loves this recipe!

Lime Chicken Tacos


Makes 12 Servings Time: Prep: 10 min. Cook: 5-1/2 hours (or 2 1/2- 3 if cooked on high)

Ingredients

* 1-1/2 pounds boneless skinless chicken breasts
* 3 tablespoons lime juice
* 1 tablespoon chili powder
* 1 cup frozen corn
* 1 cup chunky salsa
* 12 flour tortillas (6 inches), warmed
* Sour cream, shredded cheddar cheese and shredded lettuce, optional

Directions

* Place the chicken in a 3-qt. slow cooker. Combine lime juice and chili powder; pour over chicken. Cover and cook on low for 5-6 hours (or 2 1/2-3 hours on high) or until chicken is tender.
* Remove chicken; cool slightly. Shred meat with two forks and return to the slow cooker; heat through. Stir in corn and salsa.
* Cover and cook on low for 30 minutes or until heated through. Serve in tortillas with sour cream, cheese and lettuce if desired. Yield: 12 tacos.


Nutrition Facts: 1 taco (prepared with fat-free tortillas; calculated without sour cream and cheese) equals 148 calories, 2 g fat (trace saturated fat), 31 mg cholesterol, 338 mg sodium, 18 g carbohydrate, 1 g fiber, 14 g protein. Diabetic Exchanges: 2 very lean meat, 1 starch.

Disclosure: I am an Amazon affiliate. If 10 of you happen to buy this cookbook using the link to the left I may make enough money to buy some sour cream for my tacos.

Friday, May 14, 2010

Chicken Tikka Masala

I love to expose my girls to new flavors and cuisines. And, thankfully, they try new foods without protest. Because this dish was served with rice the girls thought it was Chinese- a favorite in our house. Trying to explain that it is an Indian influenced meal.... Well, I'll save that for another day.

The only change I have made in this recipe is to cut the curry paste in half- 2T was just a bit spicy for the girls.


Chicken Tikka Masala


Recipe from Good Housekeeping. Serves 4.

Ingredients
* 1 cup(s) basmati rice
* 1 tablespoon(s) vegetable oil
* 1 medium (6 to 8 ounces) onion, chopped (I use dried onion flakes)
* 2 teaspoon(s) grated, peeled fresh ginger
* 1 clove(s) garlic, crushed with press
* 2 tablespoon(s) Indian curry paste (this makes the dish quite hot- I cut it in half when I am serving this to the girls)
* 1 1/4 pound(s) skinless, boneless chicken-breast halves, cut into 1-inch chunks
* Salt and pepper
* 1 cup(s) (from 15-ounce can) crushed tomato
* 1/2 cup(s) half-and-half or light cream
* 1/4 cup(s) loosely packed cilantro leaves, chopped, plus additional for garnish

1. Prepare rice as label directs.
2. Meanwhile, in 12-inch nonstick skillet, heat oil on medium 1 minute. Add onion and cook 6 minutes, stirring frequently. Add ginger, garlic, and curry paste; cook 3 minutes longer.
3. Add chicken, 1/4 teaspoon salt, and 1/4 teaspoon freshly ground black pepper and cook 2 minutes or until no longer pink on the outside, stirring occasionally. Add tomato; cover and cook 3 to 4 minutes longer or until chicken just loses its pink color throughout.
4. Uncover and stir in half-and-half and cilantro. Spoon rice into 4 shallow bowls; top with chicken mixture and garnish with chopped cilantro.


Nutritional Information
(per serving)
Calories 430
Total Fat 13g
Saturated Fat 4g
Cholesterol 93mg
Sodium 685mg
Total Carbohydrate 42g
Dietary Fiber 6g
Sugars --
Protein 39g
Calcium --

Friday, January 29, 2010

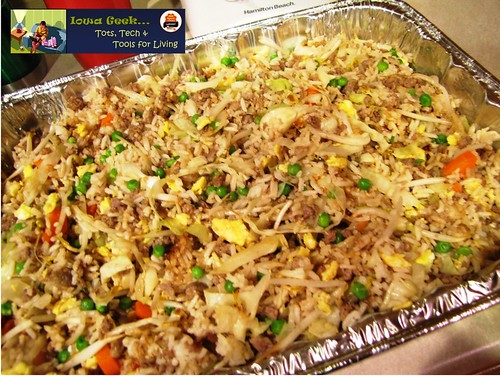
Sausage Fried Rice

A while back we purchased part of a pig. And while we've been working our way through the chops, bacon and roasts I had about 15 pounds of fresh pork sausage just sitting in my freezer. I can only make biscuits and gravy so often...

I wasn't sure what to do with the abundance of pork until I found this great recipe on AllRecipes.com. Chinese food is a favorite in this house so I knew the recipe would be a great hit- and it was! One word of warning- this makes a lot of food! I make it and freeze individual size portions for quick lunches.

Also, be sure to make the rice ahead of time so it has time to cool.


Ingredients

* 1 pound ground pork sausage
* 5 eggs, beaten
* 3 tablespoons vegetable oil
* 1/2 head cabbage, cored and shredded
* 3 carrots, chopped
* 6 cups cooked white rice, cold
* 1/4 cup soy sauce, or to taste
* 1 (14.5 ounce) can bean sprouts, drained
* 1 (6 ounce) package frozen green peas, thawed
* ground black pepper to taste
* 3 green onions, chopped

Directions

1. In a skillet over medium-high heat, cook the sausage until evenly browned. Drain, and remove sausage from the pan. In the same pan, using the remaining coating of grease from the sausage, scramble the eggs, stirring frequently until cooked through. Set aside.

2. Heat the oil in a very large skillet (I use a very large pot) or electric skillet over medium-high heat. Stir fry the cabbage and carrots just until the cabbage has wilted. Add the cold rice, and fry, stirring so that there are no clumps. Mix in the sausage and pour in some soy sauce. Stir in bean sprouts, peas, and eggs, mixing well so there are no big chunks of egg. Season with pepper, and stir in green onions just before removing from the heat. Adjust soy sauce to taste, and serve.

Friday, October 30, 2009

Irish Stew

With fall creeping in I had a strong desire for a hearty stew... And this one didn't disappoint! Filled with meat, potatoes and veggies this is a filling dinner for anyone! My girls emptied their bowls! AND told me a few times how "yummy" it was!

Traditionally Irish Stew is made with lamb- which is a bit more difficult to come by in Iowa than beef (and quite a bit more expensive). So I used beef. The key ingredient, however, is the Guinness. And, though the recipe only calls for the stew to simmer for an hour, mine was on the stove for about 4; over very low heat. The longer you simmer a stew the more flavorful the meat becomes. And your kitchen smells great all afternoon!

I served this with Mini Cheddar Scones... Both recipes are from Cuisine at Home magazine. Or try it with Irish Brown Bread...

Irish Stew and Mini Cheddar Scones


Ingredients:

2 lb lamb or beef stew meat, cut to chunks, seasoned with salt & pepper
1/4 c olive oil, divided
2 c onion, diced
2 T garlic, minced
2 T tomato paste
1/4 c all purpose flour
1/4 c Guinness (or other dark beer... But it's IRISH stew- use an Irish beer)
2 c beef broth
2 c chicken broth
2 fresh thyme sprigs (I used dried thyme leaves)
2 lb Yukon Gold potatoes (I used russet), peeled and cubed
1 c carrot, chopped
1 c frozen peas
1 c cabbage, sliced (calls for savoy, I used "regular")
salt and pepper to taste

Instructions:

Brown meat in 2T oil in a large pot over medium high heat for 8 minutes. Transfer to a bowl (with juices) and set aside. Reduce heat to medium.

Add 2T oil and onion to the pot and sweat, covered, until soft, about 5 minutes. Stir in garlic and tomato paste, cook until paste darkens, about 2 minutes. Add flor, stir to coat, and cook one minute more.

Deglaze with beer, scraping bits from bottom of the pot, then add broths, meat and juices, and thyme. Bring to a simmer, reduce heat to low, cover and simmer one hour.

(I simmered for that hour then turned off the heat but left the pot on the stove for a couple hours. When I was ready to continue I brought it back to a simmer. I think the extra time in the broth really enhances the flavor.)

Stir in potatoes and carrot. Cook until potatoes are tender, about 12 minutes, then add peas, cabbage, salt & pepper. Simmer 5 more minutes.

Saturday, October 17, 2009

Lasagna Soup

It's soup time! If you didn't get a chance to try this last winter it's soup time again!

When I saw this recipe in Family Fun I knew we would have to try it before winter ended. And now I'm kinda hoping winter will hold on just a couple more weeks so I can make it again!

This hearty and filling soup's secret is in the bottom of the bowl: a mix of cheeses that you ladle the soup on top of. After a quick mix you have gooey, melted cheeses. Mmmm...

The recipe is by Meredith Deeds and can also be found in her book 300 Sensational Soups.


RECIPE INGREDIENTS
2 teaspoons olive oil (I, honestly, omitted this. Why add oil to sausage?)
1 1/2 pounds Italian sausage (bulk or with casings removed)
2 onions, finely chopped (I used onion flakes, a few Tbsp, to taste)
4 garlic cloves, minced
2 teaspoons oregano
1/2 teaspoon red pepper flakes
2 tablespoons tomato paste
1 (28-ounce) can diced tomatoes
6 cups chicken broth
2 bay leaves
8 ounces fusilli pasta (really, any pasta will work.)
1/2 cup finely chopped fresh basil
8 ounces ricotta
1/2 cup grated Parmesan
1/4 teaspoon salt
Pinch of pepper
2 cups shredded mozzarella

1. In a large pot, heat the oil over medium heat. Add the sausage and sauté, breaking it up into small pieces with a wooden spoon, until the sausage is no longer pink, about 5 to 7 minutes. Drain any excess fat from the pot. Add the onions and sauté until softened, about 6 minutes. Add the garlic, oregano, and red pepper flakes and sauté for 1 minute. Add the tomato paste and sauté until the paste turns a rusty brown, about 5 minutes. Add the tomatoes with their juice, the broth, and the bay leaves and bring the soup to a boil. Reduce the heat and simmer for about 30 minutes.

2. Add the pasta, then increase the heat to medium-high and boil the soup until the pasta is tender to the bite, following the time recommendations on the pasta package. Discard the bay leaves, then stir in the basil. If desired, season with salt and black pepper to taste.

3. In a small bowl, combine the ricotta, the Parmesan, the 1/4 teaspoon of salt, and the pinch of pepper. To serve, place about 1 1/2 tablespoons of the ricotta mixture in each bowl, sprinkle with some of the mozzarella, and ladle the soup on top. Makes about 13 cups.

Tuesday, October 6, 2009

Gnocchi with Spinach and Ricotta

While pasta is always an easy meal I love to "mix it up" once in a while and make gnocchi. This potato dumpling, which means lumps, has been on Italian tables since Roman times.

I haven't attempted to make my own gnocchi yet but I've found some good varieties at Target and my local grocery. Just a tip- don't buy it dried. It will be in the dried pasta section but buy the kind that looks soft. It may also be in the refrigerated section.

This recipe is gooey and creamy. Mmmm... And no whining about the spinach! The recipe comes from ParentsConnect.

Gnocchi with Spinach and Ricotta


* 1 (1-pound) package potato gnocchi
* 1 cup fat-free half-and-half (ok, I don't buy this. I use skim milk. It makes a runnier sauce. I use 3/4 c and increase the flour by 1tsp.)
* 1 teaspoon flour
* ½ teaspoon salt
* ½ teaspoon pepper
* 1/8 teaspoon nutmeg
* 1 (10-ounce) bag prewashed baby spinach leaves
* ½ cup nonfat ricotta cheese
* 1 cup shredded part skim mozzarella cheese

Directions:

Preheat the broiler and move top oven rack 4 to 6 inches from heat.

In a large pot of lightly salted boiling water, cook the gnocchi according to package directions (gnocchi will float to surface when done). Drain and set aside.

Meanwhile, in a large ovenproof skillet over medium-high heat, combine the half-and-half, flour, salt, pepper and nutmeg, stirring well to mix with a wire whisk. Bring mixture to a boil. Continue to boil for 2 minutes, whisking frequently. (I don't have an oven-proof skillet. I cook it in a saucepan or regular skillet and transfer it to a casserole dish coated with cooking spray.)

Add spinach in handfuls and cook, stirring frequently until wilted, about 2 to 4 minutes.

Remove from heat, then add gnocchi, stirring to mix well.

Spoon ricotta over gnocchi in five large dollops (I add multiple smaller dollops) and sprinkle with mozzarella. Broil until cheese is lightly browned and bubbling around edges, about 3 minutes.

Thursday, July 30, 2009

Basic Quiche

I'm a huge fan of quiche. It's one of the most versatile meals I make. It works for breakfast, brunch, lunch, dinner... Another plus is that you can add veggies or meat to it easily. And my girls love quiche- we call it "cheese pie". Two of the greatest things in the world: cheese & pie. And the leftovers re-heat really well. I love when we have quiche for dinner because it means left-over quiche for breakfast!

Another reason I love this recipe is that it's a great "make & take" if you're taking a meal to someone who just had a baby, has a sick child, etc. Quiche, a bagged salad and some cookies and you've got a meal.

This is my favorite quiche recipe. It uses Gruyère, which is a bit spendy, but you can use Swiss, Emmental or Mont Saint-Benoît.

I pulled this recipe out of a magazine years ago; I'm not sure which one.

Basic Quiche


1 T olive oil
2 medium yellow onions, diced (not being an onion person I use dried, chopped onions, about 2-3 T)
3/4 t kosher salt
1/2 t black pepper
1 c fresh flat leaf parsley, chopped
4 eggs
3/4 c half & half (I mostly use skim milk; it's what I have on hand and it works)
8 oz Gruyère, grated
1/8 t ground nutmeg
1 store bought frozen deep dish pie crust, or you favorite homemade crust

Heat oven to 375 degrees. In a large skillet, over medium low heat, heat the oil. Add the onions, 1/2 t of the salt and 1/4 t of the pepper. Cover and cook until the onions are softened, 5 to 7 minutes. (Skip this step if you aren't using fresh onions.) Add the parsley and cook, covered, for 2 more minutes. Meanwhile, whisk together the eggs and half & half or milk. Stir in cheese, nutmeg, the remaining salt & pepper and the onion mixture. Place the piecrust on a foil lined baking sheet. Scrape the egg mixture into piecrust- it will be full. Bake until the filling is set and an inserted knife comes out clean; about 40 minutes. Let rest for 5 minutes. Cut into wedges and serve.

Technically this makes 4 servings. Serve with a salad.

If you want to add ham or browned sausage add it to the egg mixture after you add the cheese.

Thursday, July 16, 2009

Upside Down Deep Dish Pizza

When I hosted Mom's Nite Out a couple months ago one of the sponsors, Unilever, sent me a box of goodies that included the Family Fun Book.

About a week ago I made a recipe from that book: the Upside-Down Deep Dish Pizza. It was really quick and easy to make; and inexpensive, averaging $3.44 per serving- less, actually, because the recipe says it is 4 servings but it easily fed my family plus our babysitter and left plenty of leftovers for two lunches the next day.

Another big plus: I put spinach in it and my girls didn't even bat an eye at the "green stuff".

Upside Down Deep Dish Pizza


* 1 lb. ground beef
* 1 jar (26 oz) Ragu® Old World Style® Sweet Tomato Basil Smooth Pasta Sauce (or the sauce of your choice)
* 1 package (10 oz.) frozen chopped broccoli OR spinach, thawed and squeezed dry (optional)
* 2 cups shredded mozzarella cheese (about 8 oz.)
* 1 can (11 oz.) refrigerated pizza dough

1. Preheat oven to 375°. Brown ground beef in 12-inch nonstick skillet; drain and season, if desired, with salt and ground black pepper. Stir in Pasta Sauce and bring to a boil; turn into 2-quart baking dish.
2. Top with broccoli, then cheese. Place pizza dough over dish, sealing edges tightly.
3. Bake 20 minutes or until crust is golden. Let stand 10 minutes.

Thursday, June 25, 2009

Chicken Enchiladas with Cottage Cheese

Cottage cheese is always in our refrigerator. Caelan prefers it for breakfast and Brenna enjoys it "on the side" for lunch. So when Roberts Dairy and Mom Select sent me a couple of coupons for free cottage cheese I was excited! Not only because that is what we already use but because it's spendy!

Of course the night I planned to make these Chicken Enchiladas I was out of cottage cheese- Caelan had finished it for breakfast- so they were delayed until my next trip to the grocery store.

When we finally had these for dinner they were devoured! Caelan liked them because they had cottage cheese, Brenna liked the spicy chicken and Doug said they had a really good flavor and the creaminess was a nice contrast with the spice from the green chilis.

I did, however, make some changes to the recipe (don't I always?). I'll give you the recipe in full and my changes in italics.

Chicken Enchiladas with Cottage Cheese


You Need:
1 tablespoon vegetable oil
2 boiled and shredded skinless, boneless chicken breast halves (we grilled the chicken the day before)
1/2 cup chopped onion
1 7-ounce can chopped green chile peppers (I used a 4 oz can and it was plenty)
1 1-ounce package taco seasoning mix
1/2 cup Roberts Sour Cream
2 cups Roberts Cottage Cheese
1 pinch ground black pepper
12 6-inch corn tortillas
2 cups shredded Monterey Jack cheese
1 10-ounce red enchilada sauce

To Prepare:
For meat mixture, heat oil in medium skillet over medium high heat. Add chicken, onion and green chile peppers and sauté until browned. Then add taco seasoning and prepare meat mixture according to package instructions.

For cheese mixture, mix sour cream with cottage cheese in a medium bowl. Season with salt and pepper and stir until well blended. (The girls helped with this- they love to stir)

Preheat oven to 350 degrees.

To make enchiladas, heat tortillas until soft and place a spoonful of meat mixture, a spoonful of cheese mixture and a small amount of shredded cheese in each tortilla. Roll tortillas and place in a lightly greased 9x13-inch baking dish. Top with any remaining meat and cheese mixture, enchilada sauce and remaining shredded cheese. (I hate rolling corn tortillas. They always crack when I try to roll them. So I made this more like a lasagna. Pour a tiny bit of enchilada sauce in the bottom of the baking dish to help with sticking -about 4T- and spread it around. Layer 6 tortillas over the bottom of the dish. Pour in 2/3 of meat mixture, 2/3 of cheese mixture and sprinkle 1 1/3 cup of the cheese over the top. Cover with remaining tortillas and repeat layers with remaining meat and cheese mixtures, add enchilada sauce and sprinkle with remaining cheese.)

Bake at 350 degrees for 30 minutes or until cheese is melted.

This recipe serves 12 and reheats really well as leftovers.

This post sponsored, in part, by
Mom Select - Bringing Companies and Moms Together

Thursday, June 18, 2009

Scotch Eggs

I am a HUGE fan of Scotch Eggs. There is a lovely pub in downtown Des Moines that we visit 4-6 times a year just for their excellent fish & chips and Scotch Eggs. Having actually been in British and Irish pubs I can honestly say that they have a great ambiance and we don't feel a bit bad about taking our girls there.

What is a Scotch Egg? It is, quite simply, a hard boiled egg wrapped in sausage, coated in breadcrumbs and deep fried. Sounds divine, no?

Last week I was playing with my dinner spinner (have an iPhone or iPod Touch? Get this free app!) and trying to figure out what to do with all the sausage we got from a hog we purchased and butchered. I was impressed with the options that popped up, but the one that most caought my attention was Scotch Eggs. After browsing the various recipes I chose this one. I made a few changes, which I will detail below in italics, in the recipe.

These were great! Paired with a pint of Magners or Guinness and some Coleman's spicy mustard. Mmmmm... Delish.

Scotch Eggs


INGREDIENTS (Nutrition)

* 1 pound pork sausage meat
* 2 teaspoons Worcestershire sauce
* 4 hard-cooked eggs, peeled
* 1 tablespoon all-purpose flour
* 1/8 teaspoon salt
* 1/8 teaspoon ground black pepper
* 1 egg, beaten
* 2/3 cup dry bread crumbs
* 1 quart oil for deep frying

DIRECTIONS

1. In a medium bowl, mix together the pork sausage and Worcestershire sauce. Combine the flour, salt and pepper; mix into the sausage. If you are using plain sausage and like more flavor, add spices. I added some garlic, a bit of onion and some basil.

1.5 Make sure the eggs and the sausage are cold. I used the flour on my counter top to make the sausage patties. It helps keep it from sicking quite so much.

2. Divide the sausage into four equal parts. Pat flat on floured surface. Mold each part around one of the hard-cooked eggs, rolling between your hands to shape. Place the beaten egg and bread crumbs into separate dishes. Dip the balls into the egg, then roll in the bread crumbs until coated. Shake off any excess.

3. Heat the oil in a large saucepan or deep fryer to 365 degrees F (180 degrees C), or until a cube of bread dropped into the oil turns brown in 1 minute. Lower the eggs carefully into the hot oil. Fry for 5 minutes, or until deep golden brown.
OR
Preheat oven to 350. Heat 2 T olive oil in large pan over medium high heat. Brown all sides of the Scotch Egg adding more Olive Oil as necessary. When all are nicely browned place on foil covered baking sheet and bake for 30 minutes. Still crispy on the outside, just not deep fried so less greasy and a tiny bit better for you. Not much, but a tiny bit.

Garnish with cheddar cheese, lettuce leaves or chopped tomato.


How to hard cook eggs:

Place eggs in a saucepan and cover with cold water. Bring water to a boil and immediately remove from heat. Cover and let eggs stand in hot water for 10 to 12 minutes. Remove from hot water, cool, and peel.

Thursday, June 11, 2009

Lite Creamy Broccoli Lasagna

One of the perks of writing about food is that, sometimes, companies want you to eat their food. Depending on the company I will either accept or decline the offer.

A couple of weeks ago Robert's Dairy, a company well known in the Midwest, reached out to me via Mom Select and asked if I would be interested in trying some of their products. Trying? I already use their stuff so I, quite nonchalantly, said, "sure". OK, so I wasn't nonchalant. I told them straight up that I already used and loved their products so they should choose me. And they did.

A few days ago I received some great coupons in the mail for me as well as this link so all of you could get coupons too! Roberts Dairy serves Nebraska, Iowa, Missouri and Kansas as well as parts of Colorado, Illinois and South Dakota.


Now... About those recipes. I only received a few but you can find hundreds at the Roberts Dairy website. And, though they call for Roberts Dairy products you can, of course, use whatever brand you like.

I made the Lite Creamy Broccoli Lasagna last night. I had been looking for a new meatless recipe, and this fit the bill. As I'm not a fan of fungi (mushrooms), Doug was surprised I made this. My girls devoured it- especially the mushrooms! The cottage cheese gave it a lovely "melty" texture. It's a great way to get the kids to eat their veggies!

Lite Creamy Broccoli Lasagna


Ingredients

9 uncooked lasagna noodles (I used wheat. I think you could also use the "no boil" noodles in this, too)
1 pound fresh mushrooms, sliced
1/4 cup chopped onion
2 tablespoons Roberts Butter
1/3 cup all-purpose flour
1 teaspoon chicken bouillon granules
3/4 teaspoon garlic salt
1/4 teaspoon pepper
1/4 teaspoon dried thyme
1-1/2 cups Roberts Skim Milk
6 cups broccoli florets
1-1/2 cups Roberts 1% Cottage Cheese
10 ounces reduced-fat Swiss cheese, shredded, divided

Preparation

Cook noodles according to package directions. Meanwhile, in a large saucepan, sautè mushrooms and onion in butter until tender. Add the flour, bouillon, garlic salt, pepper and thyme; stir until blended. Gradually add milk. Bring to a boil; cook and stir for 2 minutes or until thickened. Add broccoli; cook for 3-5 minutes. Stir in cottage cheese and three-fourths of the Swiss cheese. Drain noodles.

In a 13in.x9in.x2in. baking dish coated with nonstick cooking spray, layer three noodles and a third of the sauce. Repeat layers twice. Cover and bake at 350 degrees for 35-40 minutes or until bubbly and broccoli is tender. Sprinkle with remaining Swiss cheese. Bake, uncovered, 5 minutes longer or until cheese is melted. Let stand 10 minutes before cutting.

Yield: 12 servings

This post sponsored, in part, by
Mom Select - Bringing Companies and Moms Together

Blogger template 'Pinki' by Ourblogtemplates.com 2008

Jump to TOP

ss_blog_claim=cc9e1d94f6274b95f747d51cccacf62a