Showing posts with label Now and Later. Show all posts

Sunday, June 20, 2010

Beef and Spinach Lasagna

Summer always makes life hectic and all the rain we've been experiencing brings its own set of problems. And when I'm stressed or short on sleep - or both- I crave comfort food.

Lasagna is one of those foods that just makes you feel warm and full and happy. This recipe- another one from the Taste of Home Comfort Food Diet Cookbook- takes the greatness of lasagna and makes it lower in fat and calories by adding spinach.

My girls ate this with nary a complaint. And I loved that it reheated well for lunch the next day and "leftover night" a few days later.

Beef and Spinach Lasagna


Ingredients

* 1 pound lean ground beef (or lighten it up further with ground turkey)
* 1 medium onion, chopped
* 2 jars (26 ounces each) meatless spaghetti sauce
* 4 garlic cloves, minced
* 1 teaspoon dried basil
* 1 teaspoon dried oregano
* 1 package (10 ounces) frozen chopped spinach, thawed and squeezed dry
* 2 cups ricotta cheese
* 2 cups (8 ounces) shredded part-skim mozzarella cheese, divided
* 9 no-cook lasagna noodles (or cook wheat noodles; it works just as well)

Directions

*If you opt to cook your noodles, begin with that and let them cool while you follow the rest of the steps.
* In a large skillet, cook beef and onion over medium heat until meat is no longer pink; drain. Stir in the spaghetti sauce, garlic, basil and oregano. Bring to a boil. Reduce heat; cover and simmer for 10 minutes. In a large bowl, combine the spinach, ricotta and 1 cup mozzarella cheese until combined.
* Spread 1-1/2 cups meat sauce into a greased 13-in. x 9-in. baking dish. Top with three noodles. Spread 1-1/2 cups sauce to edges of noodles. Top with half of the spinach mixture. Repeat layers. Top with remaining noodles, sauce and remaining mozzarella cheese.
* Cover and bake at 375° for 30 minutes. Uncover; bake 10-15 minutes longer or until bubbly. Let stand for 10 minutes before cutting. Yield: 12 servings.


Nutrition Facts: 1 piece (prepared with lean ground beef) equals 281 calories, 11 g fat (6 g saturated fat), 50 mg cholesterol, 702 mg sodium, 26 g carbohydrate, 3 g fiber, 20 g protein.

Disclosure: I am an Amazon affiliate. If you purchase this cookbook using the links in this post I may earn a small (very small) amount of money.

Friday, May 21, 2010

Lime Chicken Tacos

I've been trying to eat healthier. Really, I have. But sometimes you really just want "comfort food"- good, filling food that doesn't scream "DIET!" I've been trying recipes from the Taste of Home Comfort Food Diet Cookbook for a while now and this is one of my favorites.

Not only is it great for tacos, but it makes a nice chicken taco salad and chicken nachos. It reheats nicely for lunch the next day and, because it's cooked in the slow cooker I classify it as quick and easy. The entire family loves this recipe!

Lime Chicken Tacos


Makes 12 Servings Time: Prep: 10 min. Cook: 5-1/2 hours (or 2 1/2- 3 if cooked on high)

Ingredients

* 1-1/2 pounds boneless skinless chicken breasts
* 3 tablespoons lime juice
* 1 tablespoon chili powder
* 1 cup frozen corn
* 1 cup chunky salsa
* 12 flour tortillas (6 inches), warmed
* Sour cream, shredded cheddar cheese and shredded lettuce, optional

Directions

* Place the chicken in a 3-qt. slow cooker. Combine lime juice and chili powder; pour over chicken. Cover and cook on low for 5-6 hours (or 2 1/2-3 hours on high) or until chicken is tender.
* Remove chicken; cool slightly. Shred meat with two forks and return to the slow cooker; heat through. Stir in corn and salsa.
* Cover and cook on low for 30 minutes or until heated through. Serve in tortillas with sour cream, cheese and lettuce if desired. Yield: 12 tacos.


Nutrition Facts: 1 taco (prepared with fat-free tortillas; calculated without sour cream and cheese) equals 148 calories, 2 g fat (trace saturated fat), 31 mg cholesterol, 338 mg sodium, 18 g carbohydrate, 1 g fiber, 14 g protein. Diabetic Exchanges: 2 very lean meat, 1 starch.

Disclosure: I am an Amazon affiliate. If 10 of you happen to buy this cookbook using the link to the left I may make enough money to buy some sour cream for my tacos.

Friday, May 14, 2010

Chicken Tikka Masala

I love to expose my girls to new flavors and cuisines. And, thankfully, they try new foods without protest. Because this dish was served with rice the girls thought it was Chinese- a favorite in our house. Trying to explain that it is an Indian influenced meal.... Well, I'll save that for another day.

The only change I have made in this recipe is to cut the curry paste in half- 2T was just a bit spicy for the girls.


Chicken Tikka Masala


Recipe from Good Housekeeping. Serves 4.

Ingredients
* 1 cup(s) basmati rice
* 1 tablespoon(s) vegetable oil
* 1 medium (6 to 8 ounces) onion, chopped (I use dried onion flakes)
* 2 teaspoon(s) grated, peeled fresh ginger
* 1 clove(s) garlic, crushed with press
* 2 tablespoon(s) Indian curry paste (this makes the dish quite hot- I cut it in half when I am serving this to the girls)
* 1 1/4 pound(s) skinless, boneless chicken-breast halves, cut into 1-inch chunks
* Salt and pepper
* 1 cup(s) (from 15-ounce can) crushed tomato
* 1/2 cup(s) half-and-half or light cream
* 1/4 cup(s) loosely packed cilantro leaves, chopped, plus additional for garnish

1. Prepare rice as label directs.
2. Meanwhile, in 12-inch nonstick skillet, heat oil on medium 1 minute. Add onion and cook 6 minutes, stirring frequently. Add ginger, garlic, and curry paste; cook 3 minutes longer.
3. Add chicken, 1/4 teaspoon salt, and 1/4 teaspoon freshly ground black pepper and cook 2 minutes or until no longer pink on the outside, stirring occasionally. Add tomato; cover and cook 3 to 4 minutes longer or until chicken just loses its pink color throughout.
4. Uncover and stir in half-and-half and cilantro. Spoon rice into 4 shallow bowls; top with chicken mixture and garnish with chopped cilantro.


Nutritional Information
(per serving)
Calories 430
Total Fat 13g
Saturated Fat 4g
Cholesterol 93mg
Sodium 685mg
Total Carbohydrate 42g
Dietary Fiber 6g
Sugars --
Protein 39g
Calcium --

Friday, January 29, 2010

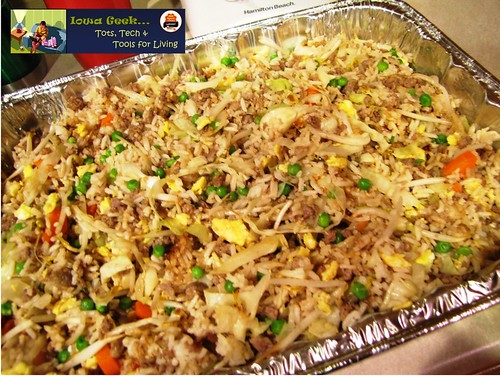
Sausage Fried Rice

A while back we purchased part of a pig. And while we've been working our way through the chops, bacon and roasts I had about 15 pounds of fresh pork sausage just sitting in my freezer. I can only make biscuits and gravy so often...

I wasn't sure what to do with the abundance of pork until I found this great recipe on AllRecipes.com. Chinese food is a favorite in this house so I knew the recipe would be a great hit- and it was! One word of warning- this makes a lot of food! I make it and freeze individual size portions for quick lunches.

Also, be sure to make the rice ahead of time so it has time to cool.


Ingredients

* 1 pound ground pork sausage
* 5 eggs, beaten
* 3 tablespoons vegetable oil
* 1/2 head cabbage, cored and shredded
* 3 carrots, chopped
* 6 cups cooked white rice, cold
* 1/4 cup soy sauce, or to taste
* 1 (14.5 ounce) can bean sprouts, drained
* 1 (6 ounce) package frozen green peas, thawed
* ground black pepper to taste
* 3 green onions, chopped

Directions

1. In a skillet over medium-high heat, cook the sausage until evenly browned. Drain, and remove sausage from the pan. In the same pan, using the remaining coating of grease from the sausage, scramble the eggs, stirring frequently until cooked through. Set aside.

2. Heat the oil in a very large skillet (I use a very large pot) or electric skillet over medium-high heat. Stir fry the cabbage and carrots just until the cabbage has wilted. Add the cold rice, and fry, stirring so that there are no clumps. Mix in the sausage and pour in some soy sauce. Stir in bean sprouts, peas, and eggs, mixing well so there are no big chunks of egg. Season with pepper, and stir in green onions just before removing from the heat. Adjust soy sauce to taste, and serve.

Thursday, August 13, 2009

Ginger Chicken with Rice Noodles

My girls are big fans of Chinese and Asian influenced foods. I'm not sure if it's because of the chopsticks or what, but the mere mention of "Chinese" for dinner makes them giddy.

This recipe was very easy to make and is quite good served cold, too. If you happen to be grilling chicken the same week you make it, just grill a couple extra, cut them and heat in a saute pan before adding to the noodles. Also, I can't always find rice noodles- it depends on where I'm shopping. I substitute angel hair pasta and get great results.

I pulled this recipe out of a magazine quite a while back... I think it was Fitness.

Ginger Chicken with Rice Noodles

  • 4 tablespoons finely chopped scallion
  • 3 teaspoons grated fresh ginger
  • 8 garlic cloves, minced
  • 2 teaspoons olive oil
  • 1/4 teaspoon salt
  • 4 4-ounce skinless, boneless chicken breast halves
  • 4 ounces dried rice noodles
  • 2 limes
  • 2 teaspoons packed brown sugar
  • 1 cup shredded carrot
  • 4 tablespoons snipped fresh cilantro
  • 4 tablespoons chopped peanuts

In a small bowl, combine scallion, ginger, 6 garlic cloves, olive oil, and salt. Coat chicken breasts with mixture and place on the unheated rack of a broiler pan. Broil 4 to 5 inches from the heat for 12 to 15 minutes, turning once.

Slice chicken diagonally; keep warm. Cook noodles in a large saucepan in boiling water for 3 to 4 minutes until tender; drain. Shred 2 teaspoons lime peel and squeeze 2 tablespoons lime juice into a bowl. Add sugar and remaining 2 garlic cloves; stir until sugar dissolves. Add noodles, carrot, cilantro and peanuts; toss. Spoon onto plates; arrange chicken on top.

Friday, March 20, 2009

Cheddar Topped Shepherd's Pie

I made this for St. Patrick's Day this year... And was made to promise that I wouldn't wait until next St. Patrick's Day to make it again!

I did make a wee change from the recipe I found in Everyday Food magazine. The directions call for 1 cup of water to be added to the meat mixture. This left the meat bland, in my opinion. Good... OK... But bland. My fix for that? Use 1 cup of Guinness. It adds flavor to the meat. Funny bit of info for you: No one in my house drinks beer. But I keep a bottle of Guinness corked (with a wine cork) and in the fridge for cooking.

Shepherd's Pie Collage

The recipe serves 8- or more. But it's really easy to half...

Ingredients
* 2 pounds baking potatoes (about 4), peeled and thinly sliced
* Coarse salt and ground pepper
* 1 tablespoon vegetable oil, such as safflower
* 6 medium carrots, halved lengthwise, quartered if large, and thinly sliced
* 6 celery stalks, thinly sliced
note: you can add practically any veggie to this: green beans, leeks, small florets of broccoli...
* 1 large onion, chopped
* 1/2 teaspoon dried thyme
* 1/4 cup all-purpose flour
* 1/4 cup tomato paste
* 2 pounds ground beef chuck (you could also use ground turkey or a half/half mix of turkey & beef)
* 1 c Guinness (optional)
* 1 cup whole milk (I used skim)
* 1 1/2 cups shredded sharp white cheddar (6 ounces)

Directions
1. Preheat oven to 450. Place potatoes in a large saucepan, and cover by 1 inch with salted water. Bring to a boil; reduce to a simmer. Cook until potatoes are easily pierced with the tip of a paring knife, 15 to 20 minutes.

2. Meanwhile, heat oil in a 5-quart Dutch oven or heavy pot over medium-high. Add carrots, celery, onion, and thyme. Cook, stirring occasionally, until vegetables are tender, 8 to 10 minutes. Add flour and tomato paste; cook, stirring, 1 minute. Add beef; cook, stirring occasionally, until no longer pink, 6 to 8 minutes. Add 1 cup water or Guinness; bring to a boil, and simmer 1 minute. Set beef filling aside.

3. Drain potatoes; return to pan. Cook over medium, stirring, until liquid has evaporated and a thin film covers bottom of pan, about 1 minute. Remove pan from heat; add milk and 1 cup cheese. Mash until smooth; season cheddar-potato topping with salt and pepper.

4. Pour beef filling into a 13-by-9-inch baking dish. Drop dollops of topping over filling; spread to edges with a spatula. Using a fork, make decorative peaks; sprinkle with remaining 1/2 cup cheese. Bake until topping is browned and filling is bubbling rapidly, about 20 minutes (if topping and filling were chilled, increase to 35 minutes). Let stand 5 minutes before serving.

Make Ahead Tip: Both filling and topping can be made up to a day ahead and refrigerated separately.

Thursday, January 15, 2009

Chocolate Cheesecake

This is an incredibly rich dessert- a little bit goes a long, long way. It's sooo yummy, though, and can be made in advance (2-3 days in the refrigerator or 3 weeks in the freezer- don't forget to defrost before serving.)

I got this recipe in a promotional mailing years ago from a company called "Great American Home Baking". I can't find an online presence for them.

Chocolate lovers rejoice! PS- this will blow your diet out of the water.

Chocolate Cheesecake


Crust
2 c chocolate wafer crumbs
5 T melted butter

Filling
3 - 8oz pkgs cream cheese, room temperature
1 c granulated sugar
5 large eggs
2 oz semi sweet chocolate, melted

Frosting
6 oz semi sweet chocolate, melted
1/2 c sour cream

To prepare crust: in a medium bowl mix together chocolate crumbs and melted butter until well blended. Press into a 9" springform pan. (I line the bottom of the pan with parchment paper).

Preheat oven to 300 degrees.

In a large bowl beat together cream cheese, sugar and eggs at medium speed until smooth. Spoon half into crust.

Stir chocolate into remaining cream cheese mixture until well blended. Drizzle over batter in pan to make swirls.

Bake for 50 minutes. Cool completely then chill, in pan covered in plastic wrap, for 2 hours.

After chilled carefully remove pan. (Cover now to freeze; thaw before frosting.)

To prepare frosting mix chocolate and sour cream in a small bowl. Spread over cheesecake and refrigerate until frosting is set. This frosting is easy to pipe so you can "pretty it up" if you want to.

Monday, October 20, 2008

Grilled Chicken Reubens

I had chicken reubens on my menu this summer on a day that was supposed to be raining. When the rain didn't appear and we were all ready to be out of the house I slapped the reubens together and decided that we would try them on one of the barbeque grills at the park. It worked out really, really well and I now have another quick meal that we can pack and tote to the park with us.

For the chicken: if you are grilling earlier in the week go ahead and toss on a couple chicken breasts. Or save some if you've roasted a chicken. Or buy some oven roasted chicken breast in the deli meat section at the grocery...


Grilled Chicken Reubens

Fab Food Friday 110


Chicken Breast
Rye Bread
Swiss Cheese slices
saurkraut, drained and squeezed dry
1/3 c mayo
2 T ketchup

Mix the ketchup and mayo to make your dressing.
Make sure your kraut is dry otherwise it will make the bread wet. (not so good)
Build sandwich: bread, cheese, chicken, dressing, bread.
Wrap tightly in foil.

When you are ready to grill just place the foil wrapped sandwiches over the coals for about 10 minutes per side (less if your coals are really, really hot). You want the cheese melted and the bread beginning to toast.

Mmmmm...

You can make these in the oven, too... No foil necessary.
Turn on your broiler and have the rack about 4 inches from the heat. Build in the same way. Broil about 2 minutes per side.

Sunday, October 19, 2008

Herbed Biscuits

There isn't much better than biscuits fresh from the oven with a hot bowl of soup. And while I have yet to make a tomato soup from scratch that rivals my canned fave (Progresso Tomato Basil) these biscuits (recipe from Everyday Food magazine) are insanely simple.

And the bonus? They can be made and frozen for up to a month! Just grab what you need when you need them! And you probably have everything you need to make these in your cupboards!

Herbed Biscuits

Ingredients:

4 c all purpose flour- spooned & leveled, plus a bit more
2 T baking powder
1 1/2 t salt
8 T (1 stick) cold unsalted butter, cubed
1/2 c fresh chives, thyme, sage (or a mixture)... I used dried and it was still yummy
2 c cold milk

Directions:

Heat oven to 400. (The instructions call for this to be made in a food processor. I don't know what kid of food processor they use but mine -which is quite nice- couldn't handle the flour. I used my mixer and it was fine...)

Combine flour, baking powder, salt, and butter. Mix (or pulse) until pea size pieces form. Add chives and milk (through tube if using food processor) and mix (or pulse) until combined.

Move mixture to a floured surface (it will be sticky!); with floured hands pat to a 3/4 inch thickness. Using a biscuit cutter (or a child's drinking glass- 2 1/2 inches) dipped in flour to prevent sticking, cut dough into 16 rounds. (Don't forget to gather dough and pat it down again and again until you have used as much as you can!)

Place on baking sheet 1 inch apart and bake for 15 minutes.

OR

Place (uncooked) buscuits on a cookie sheet at place in freezer until firm (2+ hours). Place in resealable plastic bag and freeze for up to one month. Bake from frozen at 400 degrees for 15- 20 minutes; until golden.

Friday, October 3, 2008

Baked Cheese and Pesto

I have a fondness for appetizers. Even more than dessert, for appetizers often involve cheese and some sort of bread or crackers.

Or, if you are very, very lucky, it will involve both. As this Baked Cheese and Pesto recipe I found in a Kraft magazine a few years ago does.

I will tell you, quite honestly, that the first time I made this it wasn't quite so pretty. The dough can be a bit tricky to work with. Just remember that no matter how bad it looks A) it still tastes good! and B) practice makes perfect.

And a tip to save yourself stress: Prepare this ahead of time- when no one else is in the kitchen looking over your shoulder- and refrigerate it until time to cook. (Of course that didn't happen to me... Why do you ask?)

Cheese and Pesto Bake Collage


1 can (4 oz.) refrigerated crescent dinner rolls
1 pkg. (8 oz.) Cream Cheese (use 1/3 fat type to cut calories)
2 Tbsp. pesto
2 Tbsp. chopped roasted red peppers (chopped)
1 egg, lightly beaten

PREHEAT oven to 350°F. Unroll dough on lightly greased baking sheet; firmly press seams together to form 12x4-inch rectangle.

CUT cream cheese horizontally in half with sharp knife. Place one of the cream cheese pieces on half of dough; top with 1 Tbsp. of the pesto and the peppers. Cover with remaining cream cheese piece; spread top with remaining 1 Tbsp. pesto. Brush dough with egg; fold in half to completely enclose filling. Press edges of dough firmly together to seal. Brush top with any remaining egg.

BAKE 15 to 18 min. or until lightly browned. Cool 10 min. Serve with crackers or toasted pita chips and cut-up fresh vegetables.

I used one of the girls' toy cookie cutters to make the little shapes on the top.

Friday, September 26, 2008

Gouda Mashed Potato Casserole

While I like a good mashed potato they are just always "there", you know? Something that you cover with gravy or stuffing to eat. These potatoes, layered with Gouda and then baked, are phenomenal all on their own- no gravy needed!

And the best thing? You can make these a day ahead and refrigerate them until they need to be baked! Perfect for family gatherings!

Gouda Mashed Potato Casserole


Ingredients

* 3 1/2 lbs russet potatoes, peeled & cubed
* 1 cup whole milk
* 1/2 cup sour cream
* 6 tablespoons unsalted butter
* 6 slices bacon, thick sliced, diced
* salt
* 2 cups Gouda cheese, shredded, divided (If you can't find Gouda you can use a sharp cheddar)
* 1/4 cup chopped fresh chives

Directions

Preheat oven to 375 degrees.

Boil potatoes in salted water in large pot over high heat until tender, 12 minutes.

Drain, return potatoes to the pot, and dry over medium heat for 1 minute.

Turn off heat, add milk, sour cream, and butter; mash until smooth, cover, and set aside.

Saute bacon in a skillet over medium-high heat until crisp.

Drain on a paper-towel lined plate, then stir into mashed potatoes; season with salt.

Assemble casserole, spreading half the potatoes in a 2 quart casserole dish.

Top with 1 cup of gouda, spread with remaining potatoes, then top with remaining cheese.

(At this point you can put these in the refrigerator and bake them the next day)

Bake until golden, 30 minutes.

Garnish with chives.

Friday, September 5, 2008

Crêpes

I adore a crêpe. What's not to like? You can pair them with jelly or syrup for breakfast, wrap a salad in them for lunch, serve them with a thick stew for dinner or pair them with ice cream and chocolate sauce for dessert. Or have them for a snack just sprinkled with powdered sugar.

Honestly, crêpes are so incredibly versatile and easy to make... You could have entire day of crêpe dishes and not get bored.

Of course crêpes are one of those things that intimidated me and I held on to this recipe (that came from a Glad advertisement a few years ago) until this past weekend. And then I wondered why I waited.


Fab Food Friday 108


You will need:
3/4 c + 1 T all purpose flour
3 T superfine sugar (I pulsed regular sugar in my Magic Bullet for a couple seconds - it's one of my most used appliances)
1/8 t salt
1 3/4 c milk
2 large eggs
unsalted butter

Whisk together flour, sugar and salt in a large bowl (I used a plastic measuring pitcher for easy pouring). In a medium bowl (I used a the blender on my Magic Bullet) whisk together milk and eggs. While whisking flour mixture slowly add milk mixture and whisk until smooth.

Heat an 8 or 9 inch nonstick skillet over medium heat. Rub with butter. Pour in about 3 T of the batter. Tilt and rotate pan until batter is evenly spread. Cook until top is dry and bottom is golden brown in spots, about 3 minutes. Gently flip over and cook one minute more.

Remove to plate.

Now you can eat immediately or store (using Glad products, hence the ad) by placing first crêpe on a sheet of plastic wrap, placing another sheet of plastic wrap on top of it and alternating between crêpes and plastic until you have finished cooking. Then store in refirgerator up to 3 days. You can heat in microwave (with the plastic wrap if you use Press N Seal) for one minute.

A note on flipping... use a thin and wide spatula and move slowly. You may destroy a couple crêpes until you get the hang of it. They may not be pretty but they'll still be edible!

Friday, June 27, 2008

Spinach Quiche

I love a good quiche. It's great for just about any meal. You can serve it with fresh fruit for breakfast or brunch and with a salad fro lunch or dinner.

The biggest problem with many quiches is that they call for expensive cheeses. Which make wonderful quiche but can add up if you're on a budget. Which I am. Which is why I try to feed my family two meatless meals a week. And it just doesn't make a lot of sense to try to save money by foregoing meat if you're going to spend an enormous amount on cheese....

I found this spinach quiche recipe at Allrecipes.com and modified it a bit until I had it just right for us. It's a recipe that is almost impossible to screw up so experiment with it.

I let the girls help mix the "cheese pie". Whenever they are involved in the making of dinner it always helps with the eating of dinner. Well, that and the fact that it's cheese... And pie... Who doesn't like that?

Here's my version:

Spinach Quiche


Fab Food Friday 108


Fab Food Friday 109


INGREDIENTS
2 T olive oil
3 cloves garlic, chopped
2 T dried onion flakes
1 (10 ounce) package frozen chopped spinach, thawed and drained
1 (6 ounce) package herb and garlic feta, crumbled
1 (8 ounce) package shredded Cheddar cheese
salt and pepper to taste
1 (9 inch) unbaked deep dish pie crust
4 eggs, beaten
1 cup milk
salt and pepper to taste


DIRECTIONS
Preheat oven to 375 degrees F (190 degrees C). When oven is heated bake pie crust for 5-7 minutes to prevent a soggy bottom.

In a medium skillet, melt butter over medium heat. Saute garlic and onion in butter until lightly browned, about 7 minutes. Stir in spinach, feta and 1/2 cup Cheddar cheese. Season with salt and pepper. Spoon mixture into pie crust.

In a medium bowl, whisk together eggs and milk. Season with salt and pepper. Pour into the pastry shell, allowing egg mixture to thoroughly combine with spinach mixture.

Bake in preheated oven for 15 minutes. Sprinkle top with remaining Cheddar cheese, and bake an additional 35 to 40 minutes, until set in center. Allow to stand 10 minutes before serving.

Friday, May 23, 2008

Shredded Chicken Enchiladas

If you're grilling or baking chicken breast toss in a few extra (about a pound) to make these super easy enchiladas later in the week.

I made these last night and they were so yummy! The cream cheese gives the filling a creaminess and counters the zest of the salsa. To easily shred the chicken just use two forks to pull the cold chicken apart.

Shredded Chicken Enchiladas

Fab Food Friday 108

1 clove minced garlic
About 1 pound chicken breast, shredded
1 cup chunky salsa
4 oz cream cheese, cubed (I use the fat free)
1 T cilantro
1 t cround cumin
1 c shredded taco cheese
8 tortillas

Preheat oven to 350. Line 13x9 baking dish with release foil (for easy clean up).Heat large skillet sprayed with cooking spray over medium heat. Add garlic, cook about 2 minutes. Add chicken, 1/4 cup salsa, cream cheese, cilantro and cumin; cook until heated through. Add 1/2 cup of cheese, mix well.

Heat the tortillas in the microwave between two moistened paper towels for about 25 seconds. Spoon about 1/3 c of chicken mix into each tortilla, roll. Place seam side down in baking dish. Top with remaining 3/4 c salsa and 1/2 c cheese.

Bake 15 minutes until heated through.

Friday, May 2, 2008

Vegetable Enchiladas

I usually balk at taking a nice, meaty dish and making it vegetarian. This, however, is wonderful. The meat is replaced with black beans, corn and spinach and the cheese is a spicy pepper jack. So yummy. From Everyday Food magazine.

I love this recipe because it's really easy and you make 2 batches at once- one for tonight and one for later (it can be frozen for up to 2 months).

Vegetable Enchiladas

Fab Food Friday 098


2 T olive oil + more for dishes
2 t ground cumin
1/4 c allpurpose flour (spooned and leveled)
1/4 c tomato paste
1 can (14.5 oz) reduced sodium vegetable broth (I had chicken broth in my pantry & it was fine)
course salt & ground pepper
3 c grated pepper jack cheese (12 oz)
1 can (15 oz) black beans, rinsed and drained
1 box (10 oz) frozen chopped spinach, thawed and squeezed dry
1 box (10 oz) forzen corn kernels, thawed
6 scallions, thinly sliced, white & green parts separated (I skipped this)
16 corn tortillas (6 inch)

Make sauce: in a medium sauce pan heat oil over medium (I skipped the oil). Add 1 t cumin, flour and tomato paste. Cook, whisking, 1 minute. Whisk in broth and 3/4 c water; bring to a boil. Reduce to a simmer and cook until slightly thickened, 5 to 8 minutes. Season with salt & pepper; set aside.

Make filling: In large bowl combine 2 c cheese, beans, spinach, corn, scallion whites and remaining 1 t cumin; season with salt & pepper.

Preheat oven to 400. Lightly oil 2(two) 8x8 baking dishes (I used Reynolds non stick foil); sett aside. Stack tortillas and wrap in damp paper towels; microwave on high for 1 minute. Top each tortilla with 1/3 c filling, roll tightly and arrange, seam side down, in prepared baking dishes.

To cook now: dividing evenly sprinkle enchiladas with remaining cheese and top with sauce. Bake, uncovered, until hot & bubbly, 15 to 20 minutes. Cool 5 minutes. Garnish with scallion greens (I used sour cream).

To freeze: Prepare enchiladas through step 3. Top with cheese and cover baking dishes with plastic wrap and then aluminum foil. Place sauce in airtight container. Freeze for up to 2 months.

To bake from frozen: Thaw sauce in refrigerator overnight (or microwave on high 2 minutes stirring once half way through). Preheat oven to 400. Remove foil & plastic wrap and pour souce over enchiladas. Replace foil. Bake 30 minutes, remove foil and bake until bubbly, about 15 minutes more. Cool 5 minutes before serving.

Blogger template 'Pinki' by Ourblogtemplates.com 2008

Jump to TOP

ss_blog_claim=cc9e1d94f6274b95f747d51cccacf62a