Friday, November 18, 2011

Candied Citrus Peels – A Delicious & Frugal Gift

I'm not really a Martha Stewart wanna-be (though I know I may appear that way at times!) but when this recipe showed up in her magazine last year, along with other classic confections, I pulled the pages out of the magazine because they were so pretty. I never really intended to make them… Then came our family’s annual gathering. We don’t officially call it Christmas as it takes place in October (for my grandfather’s birthday) but we do our gift giving then.
My grandfather is impossible to buy for and wants nothing… So I have begun to gift him with homemade treats. Last year’s gift was candied citrus peels.


Despite what you may think, these are quite easy to make. They are just time consuming. But they are beautiful and people will ooh and aah over them, taste them and tell you how amazing they are. (Which means you are pretty amazing for making them!)

Here’s what you need:
2 grapefruits, 3 oranges, or 4 lemons
4 cups sugar, plus more for rolling
4 cups water

1st Step in Candied Citrus Peels


Step 1:
Using a paring knife very carefully make 6 slits along curve from top to bottom of each citrus fruit, cutting through peel but not into fruit. Using your fingers (I used a citrus peeler), gently remove peel. Reserve fruit for another use. Slice each piece of peel lengthwise into 1/4-inch-wide strips. Using a paring knife, remove excess pith from each strip and discard (this is time consuming).

Steps 2 & 3 Candied Citrus Peels


Step 2:
Place citrus strips in a large saucepan, and cover with cold water. Bring to a boil, then drain. Repeat twice (total of 3 times).

Step 3:
Bring sugar and water to a boil, stirring occasionally until sugar dissolves. Stop stirring. Wash sides of pan with a wet pastry brush to prevent sugar crystals from forming. Add strips to boiling syrup, reduce heat to medium-low, and simmer gently until strips are translucent, about 1 hour. Remove from heat, and let strips cool in syrup. (Strips in syrup will keep, covered and refrigerated, for up to 3 weeks.)

This is where I stopped on day 1 and continued the next day. I liked that I didn’t have to do it all at once.

The finish:
Using a slotted spoon, transfer strips to a wire rack placed on a rimmed baking sheet. Wipe off excess syrup with paper towels, then roll strips in sugar. Arrange in a single layer on a wire rack, and let dry for at least 30 minutes (I suggest an hour). Sugared peels will keep, covered at room temperature, for up to 2 weeks.

Candies Citrus Peel


Of course Martha Stewart has a very attractive way of packaging these. Mine didn’t package that way, but it was pretty, none-the-less.
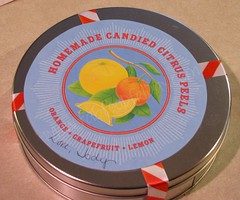
I bought a tin at Michael’s for $2.99 and holiday ribbon for $1. I cut circles for the base of the tin and the lid from waxed paper. I cut the ribbon into 2 pieces, taped the ends to the lid and attached the label to the top.
In total I spent under $10 for this gift. My grandfather enjoyed it (mostly because I took the time to make it) and everyone in my family had to try one – and then rave about them!
These are also great for any gathering you may be hosting or attending.

Friday, November 4, 2011

Brie En Croute

I've made this appetizer a few times now and everyone just raves about it. It’s delish! The brown sugar and walnus add an incredible sweetness and crunch to the brie. And it’s super easy to make. In fact, I think I’ll make it for my family’s Christmas gathering. Mmmm…

The recipe comes from Paula Deen and the Food Network.

And, just so you sound really smart, en croute means “in a crust”.

Brie En Croute


Ingredients
* 1 sheet frozen puff pastry (I prefer Pepperidge Farm)
* 1 tablespoon unsalted butter
* 1/2 cup walnuts
* 1/8 teaspoon ground cinnamon
* 1 (8-ounce) wheel Brie
* 1/4 cup brown sugar
* 1 egg, beaten

Directions
Preheat oven to 375 degrees F.

Defrost puff pastry for approximately 15 to 20 minutes and unfold. Press seams together to strengthen and lightly roll pastry; about 1″ width and length.

In a saucepan, melt the butter over medium heat. Saute the walnuts in the butter until golden brown, approximately 5 minutes. Add the cinnamon and stir until walnuts are coated well; remove from heat.

Lay the puff pastry out on a flat surface. Place the brie in the center of the pastry. Place the walnut mixture on top of the Brie and sprinkle the brown sugar over the mixture. Gather up the edges of the brie, pressing around the brie and gather at the top. Gently squeeze together the excess dough and fold down, almost like wrapping a present. (If you have kitchen twine you can tie the pastry together,like the top of a sack.)

Brush the beaten egg over top and side of Brie. Place Brie on a cookie sheet and bake for 20 minutes until pastry is golden brown.

Serve with crackers.

Friday, October 14, 2011

Chicken Fajitas in the Microwave

Fajitas are a relatively easy dish to make- if you want to fire up the grill. So we rarely made them outside of the summer months.


A couple years ago my sister in law began selling Pampered Chef products and I bought the Deep Covered Baker for its versatility. Besides, who doesn’t love Pampered Chef? Anyway… I got the following recipe for chicken fajitas that can be made in the microwave in 15 minutes. Including prep time you’ve got dinner in less than 30 minutes. And it’s really good!

Chicken Fajitas


Ingredients:
2 medium onions
1 red bell pepper
1 green bell pepper
4 boneless, skinless chicken breasts
2 T Chipotle rub (or fajita seasoning)
1 pkg fajita tortillas
8 oz sour cream
8 oz block or shredded cheese

Directions:
Slice onions and peppers; place in bottom of deep covered baker. Sprinkle with 1 T chipotle rub.
Sprinkle remaining chipotle rub on both sides of chicken and place chicken breasts on top of vegetables. Cover and microwave for 12-15 minutes.
Chicken Fajitas
Meanwhile, wrap tortillas in foil and put in oven to warm at 250° (or place on microwave safe plate with damp paper towels and heat for about a minute).

When the chicken is done remove peppers and onions to a separate bowl and chop the chicken- leave it in the broth.
Chicken Fajitas
Serve with sour cream, cheese and your favorite fajita toppings.

*Obviously you would use the same ingredients if you want to grill your fajitas. The vegetables will take less time, or use indirect heat on them. I really like a BBQ grill basket for veggies.

Friday, October 7, 2011

Apple – Cinnamon Strudel

I’m not a big fan of apple pie. I can’t really pin point the reason for that as I love apple dumplings, but the facts stand; I really don’t care for apple pie. It is fall, however, and with fall comes apple picking season. And I do love the smell of apples and cinnamon and apples baking. Mmmm… I’m not sure there is a more homey smell.


For a recent family gathering I decided to try apple strudel. I used a recipe I found in Everyday Food magazine. It turned out really well and was gone in minutes. This is best served warm (maybe with cinnamon ice cream) but is very tasty at room temperature, too. (My husband says it is a fabulous breakfast!)

The recipe “serves 6″ but those are really big pieces; you can easily serve 10-12 in my opinion.

Apple- Cinnamon Strudel


Ingredients:
* All-purpose flour, for rolling
* 1 sheet puff pastry (from a 17.3-ounce package), thawed
* 3 tablespoons unsalted butter
* 3 pounds Gala or Fuji apples (about 6), peeled, cored, and thinly sliced
* 1/2 cup plus 2 tablespoons sugar
* 1/2 teaspoon ground cinnamon

Directions:
1. Preheat oven to 400 degrees; line a baking sheet with parchment paper or foil. On a lightly floured work surface, unfold pastry; roll out to a 12-by-14-inch rectangle. Be sure you reinforce the folds in the pastry or they will split and leak during baking. Place on sheet; refrigerate.

2. In a large skillet, melt butter over medium; reserve 1 tablespoon in a small bowl. To skillet, add apples, 1/2 cup sugar, and cinnamon. Increase heat to medium-high; cook, tossing occasionally, until apples are tender and liquid has evaporated, about 15 minutes. Spread filling on a second rimmed baking sheet; let cool completely.

3. With one short side of dough facing you, mound filling horizontally in a strip across the center, leaving a 1-inch border on both long sides. Fold top part, then bottom part of dough over filling. Turn pastry over, seam side down. The easiest way to turn the filled pastry is to have the pastry on a piece of foil. After filling and folding pastry fold foil over the pastry and slowly turn the pastry enclosed in the foil. Bake on the foil to keep your baking sheet clean.

4. Brush pastry with reserved melted butter; sprinkle with remaining 2 tablespoons sugar. Using a paring knife, cut steam vents in center of pastry. Bake until golden brown, 35 to 40 minutes. Let rest 10 minutes before serving.

Friday, August 19, 2011

Favorite Irish Recipes

My favorite holiday is St. Patrick's Day. What can I say, I'm Irish. I invite friends and family over for an Irish Feast that includes many traditional- and some not so traditional- recipes. I've enjoyed adding to my recipes over the years and recently created an ebook of my Favorite Irish Recipes.

Included in the book are 9 of my most requested Irish recipes accompanied by beautiful images of Ireland, taken by me during our travels.

The ebook is only $4.99. The ebook looks terrific on a computer or tablet and has been formatted to print (use landscape mode and heavy paper).

To celebrate my first ebook I am giving away an 8x8 hardbound copy at my site Ireland with Kids. I invite you to visit my Ireland site and enter to win my Favorite Irish Recipes book.

View a sample page of my Favorite Irish Recipes.
Or Add to Cart and purchase via PayPal.

Friday, August 5, 2011

Shrimp Tacos with Guacamole and Slaw

I seem to be featuring a lot of seafood lately. Probably because my husband does the "man cooking" (aka grilling) in the summer and I don't cook as much.

I found this Baja-Style Shrimp Tacos recipe in Family Circle and it looked delicious! My cabbage mix wasn't quite so colorful, and I didn't use prepared guacamole, but this has become an easy favorite for quick summer meals!

Shrimp Tacos


marinade and dressing
1/3 c cilantro leaves, finely chopped
1/4 c fresh lime juice
1/4 c olive oil
1 tbsp honey
1/2 tsp chili powder
1/2 tsp salt
1/4 tsp ground cumin
1/4 tsp pepper

tacos
1 lb cleaned medium shrimp
4 c finely shredded cole slaw mix
1 package taco-size flour tortillas (8 per package)
1 c prepared guacamole (I used half an avocado and mixed it with some fresh salsa. Yum!)

Directions
Marinade and Dressing: in a small bowl, whisk all ingredients together.

Tacos: Heat broiler to high. In medium-size bowl, combine 1/4 cup o the marinade and the shrimp. In a second medium bowl, combine remaining marinade and the cole slaw mix. Let both marinate for 10 minutes.

Transfer shrimp to a broiler pan. Broil, 2-3 inches from heat, for 6-7 minutes, turning once.

Spread a tortilla with about 2 tbsp guacamole. Top with 4-5 shrimp and 1/4 cup slaw. Repeat with all ingredients.

Sunday, July 31, 2011

Incredible Irish Car Bomb Cupcakes

There are three items that I always seem to have in my home:

The essential ingredients in Irish Car Bomb Cupcakes

Funnily enough, they are used mainly for baking and rarely for drinking. Now, with these three ingredients you could make an Irish Car Bomb: pour a pint of Guinness. In a 2 shot glass mix a shot of whiskey and a shot of Irish Cream. Drop into the Guinness and chug it down before it curdles.

Not your idea of fun? Mine either. But these incredible Irish Car Bomb cupcakes will have you thanking the brave mix-master who created the drink.

Just a note: the alcohol of the Guinness bakes out of the cupcake itself, but the ganache and frosting can be potent, depending on how much alcohol you use.

I've adapted this recipe from some of my favorite individual recipes, as well as taken tips from the BrownEyedBaker blog. This recipe makes 24 cupcakes.

Irish Car Bomb Cupcake

Ingredients
For the Cupcakes:
1 cup Guinness stout
1 cup unsalted butter; room temperature
¾ cup cocoa powder (Dutch process if you have it)
2 cups all-purpose flour
2 cups granulated sugar
1½ teaspoons baking soda
¾ teaspoons salt 2 eggs
2/3 cup sour cream

For the Whiskey Ganache Filling:
6 ounces bittersweet chocolate
2 ounces unsweetened chocolate
2/3 cup heavy cream
2 tablespoons butter; room temperature
2 teaspoons Irish whiskey

For the Baileys Frosting:
2 cups unsalted butter; room temperature
3-4 cups powdered sugar
8 tablespoons Irish Cream (taste test frosting; I tend to like mine strong)

Directions:
For Cupcakes:
Preheat oven to 350 degrees F. Line 24 cupcake cups with liners.

Bring the Guinness and butter to a simmer in a saucepan over medium heat. Add the cocoa powder and whisk until smooth. Remove from heat and allow to cool slightly.

Whisk flour, sugar, baking soda and salt in a large bowl. Using an electric mixer, beat the eggs and sour cream on medium speed until combined. Add the Guinness mixture to the egg mixture and beat just to combine. Reduce the speed to low, add the flour mixture and beat briefly. Using a rubber spatula, fold the batter until completely combined. Divide the batter among the cupcake liners.

Bake until a toothpick inserted into the center comes out clean, 15-18 minutes. Cool completely.

For Whiskey Ganache Filling:
Place 1 oz pieces of chocolate in a heatproof bowl. Heat the cream until simmering and pour it over the chocolate. Let it sit for one minute and then, using a rubber spatula, stir it until smooth. Add the butter and whiskey; stir until combined.

Let the ganache cool until thick but still soft enough to be piped. (Refrigerate if necessary)

Making Irish Car Bomb Cupcakes


Fill the Cupcakes:
Using a 1-inch round cookie cutter (or a small paring knife), cut the centers out of the cooled cupcakes, going about two-thirds of the way down. Transfer the ganache to a piping bag with a wide tip and fill the holes in each cupcake to the top (or over the top- you will have enough ganache).

Whiskey Ganache filling in Irish Car Bomb Cupcake


For Baileys Frosting:
With hand mixer, whip the butter on medium-high speed for 5 minutes, scraping the sides of the bowl occasionally. Reduce the speed to medium-low and gradually add the powdered sugar- a few tablespoons at a time- until all of it is incorporated.

Add the Baileys, increase the speed to medium-high and whip for another 2 to 3 minutes, until it is light and fluffy. Frost the cupcakes; add chocolate shavings or sprinkles if desired. Store the cupcakes in an airtight container, refrigerated, for up to 3 days.

Cross-section of Irish Car Bomb Cupcake


Friday, July 15, 2011

Grilled Scallop Teriyaki Salad

I've had this recipe waiting until we had a grill that wouldn't decimate scallops. You see, my husband is a charcoal and wood grill guy and it can be really difficult to regulate temperature on one of those. As scallops are a bit more tender than say, steak, this recipe didn't get used until recently when I bought my husband a dual gas/charcoal grill for Father's Day.

Scallops are probably my favorite shellfish- I could have them weekly. And since we got our Costco membership they are actually somewhat affordable. The scallops didn't glaze quite as much as I expected, but I suspect my husband may have flipped them one too many times. But they were still delicious and a wonderful addition to the crisp salad.

Grilled Scallop Teriyaki Salad


Recipe adapted from Cuisine at Home.

Ingredients:
* 1 cup teriyaki sauce (use your favorite or try the teriyaki sauce recipe I use)
* 1/4 cup fresh lime juice
* 2 tablespoons fresh ginger, minced
* 1 tablespoon garlic, minced
* 12 large sea scallops (1 1/2 lb.)
* 1 cup broccoli floret
* 1 cup snow peas
* 2 cups napa cabbage, thinly sliced (I used prepared coleslaw mix)
* 1 cup carrot, cut in matchsticks (I used prepared coleslaw mix)
* 3/4 cup chow mein noodles
* 1/2 cup pineapple chunks
* 1/2 cup fresh cilantro, chopped


Directions:
1. Preheat grill to high.
2. Whisk teriyaki sauce, lime juice, ginger and garlic together in a bowl. Reserve half the mixture for the salad; pour the rest over the scallops in a resealable plastic bag. Marinate 20 minutes, chilled.
3. Blanch broccoli and peas in boiling salted water for 1 minute. Transfer to ice water, then drain. Toss blanched vegetables in a large bowl with remaining ingredients and reserved dressing (marinade).
4. Grill scallops until cooked through, 2-3 minutes per side, brushing with marinade. Remove from grill and serve on top of salad.


Friday, July 8, 2011

Individual Chocolate Mousse Cakes

There are times when nothing will do but incredibly intensely rich chocolate. And these individual chocolate mousse cakes conquer any chocolate craving. This recipe is made with only three ingredients; the cakes are both simple and decadent.

These are best if served warm, so the centers are still gooey but are quite good chilled when the middle has the texture of taffy.

Individual Chocolate Mousse Cakes


Recipe adapted from parents.com. Makes 12 individual cakes.

Ingredients

* 2 bars (7 ounces each) milk chocolate
* 6 large eggs
* 1/4 cups plus 2 tablespoons all-purpose flour

Directions

1. Heat oven to 325°F. Line a standard-size 12-cup muffin pan with paper liners.

2. Melt chocolate in microwave. Begin with one minute. Stir. The heat in 30 second increments, stirring after each, until melted.

3. Stir eggs and flour into melted chocolate with wire whisk or wooden spoon. Ladle into prepared muffin-pan cups, dividing equally.

4. Bake in 325°F oven for about 12 minutes or until sides of cupcakes are set but centers are still liquid. Cool cupcakes in pan for 5 to 10 minutes. Centers will set into warm mousse. Serve with vanilla bean ice cream.

Friday, June 24, 2011

Beautiful, Easy & Delicious Shrimp Scampi recipe

One of my favorite cooking magazines is Cuisine at Home. Though the recipes can often appear complex, they are just very detailed- which means that they come out consistently delicious!

This Broiled Shrimp Scampi with Parmesan crust is easy to make and impressive to serve to guests. It's also easy to increase servings. The recipe, as written, serves 2.

Web Images 3 - Page 037


* 1/2 Stick Unsalted Butter
* 1 Tbsp. Fresh Lemon Juice
* 1 Tbsp. Minced Garlic
* 1/4 tsp. Dried Dill
* Salt and Black Pepper to taste
* 2 Tbsp. Fresh Bread Crumbs (I used Panko)
* 1 Tbsp. Shredded Parmesan
* 1/2 tsp. Dried Oregano
* 1/4 tsp. Paprika
* 10-12 Extra Large Shrimp, peeled, tails left on and deveined, about 8 oz. (Purchase shrimp that has been peeled and deveined if possible- you will save a ton of time!)

Preheat broiler with oven rack 6-8 inches from the heating element.

Melt butter in a saucepan over medium heat. Stir in lemon juice, garlic, dill, salt, and pepper. Let stand off heat to steep.

Combine bread crumbs, Parmesan, oregano and paprika in a small bowl; set aside.

Coast two 6 oz. casserole dishes with nonstick spray and place on a baking sheet. Arrange shrimp evenly in each dish. Divide butter mixture evenly between dishes and top with bread crumb mixture.

Broil until shrimp are cooked and bread crumbs are golden brown, about 5 to 7 minutes. Let cook 1 minute before serving.

I served this with a simple Caesar salad for a lovely light meal.

Friday, June 10, 2011

Shrimp and Black Bean Wraps

I was craving shrimp tacos the other night and this recipe, though technically a wrap, was perfect. The crushed pineapple gives it a sweetness that is surprising and completely delicious. Brenna gobbled this up- and asked for seconds! (I had a good idea of this recipe's kid-friendliness as it came from ParentsConnect!)


Shrimp & Black Bean Wraps


Ingredients
1 tablespoon canola oil
1 pound raw, peeled and deveined shrimp, fresh or frozen
1 teaspoon bottled minced garlic
¼ teaspoon salt
¼ teaspoon pepper
1 (15-ounce) can black beans, rinsed and drained
1 cup frozen corn kernels, thawed (I added these frozen)
1 cup salsa
1 (8-ounce) can crushed pineapple, drained well
¾ cup reduced-fat shredded cheddar cheese (I used Pepper Jack for a bit more "kick")
6 (8-inch) flour tortillas

Optional:
shredded lettuce
mashed avocado


In a large skillet over medium-high heat, heat the canola oil.

Add the shrimp, garlic, salt, and pepper and cook, stirring frequently for 2 minutes, until shrimp are pink.

Add the black beans, corn, salsa, and pineapple, stirring well to mix, and cook for 2 minutes, until heated through.

Add the cheese and cook for 1 minute, until melted.Warm the tortillas according to package directions.

Divide the shrimp and black bean mixture evenly among the 6 tortillas. Add optional toppings.

Friday, June 3, 2011

Pasta with Chicken Sausage and Broccoli

Pasta is easy- we have it, in some form, once a week. I love this recipe because it takes the ease of pasta and “upgrades” it with sausage and a vegetable. My girls love this.


Of course you can switch things out… I usually use half a ring of turkey kielbasa instead of the chicken sausage and you could easily use a different vegetable.

I found this recipe in Real Simple magazine.


Serves 4 Total Time: 20m

Ingredients
* 12 ounces rigatoni (about 4 1/2 cups) (I use what I have on hand)
* 1 tablespoon olive oil
* 1 onion, sliced (I use dried chopped onion, about 2T)
* 6 ounces fully cooked chicken sausage links, sliced (I use turkey kielbasa, sliced and browned for a couple minutes in a skillet)
* 1 small head broccoli, cut into florets and stems sliced
* 1/4 cup grated Parmesan (1 ounce)

Directions
1. Cook the pasta according to the package directions.

2. Meanwhile, heat the oil in a large skillet over medium-high heat. Cook the onion, stirring often, for 3 minutes. Add the sausage and cook, stirring, until browned, 2 to 3 minutes. Add the broccoli and 1¼ cups water and simmer, covered, until the broccoli is tender, 5 to 6 minutes.

3. Toss the pasta with the sausage mixture and any remaining liquid and the Parmesan.

Friday, May 20, 2011

Meatless Quesadillas Two Ways

Quesadillas are a quick & easy meal in our house. Often it’s leftover meat and a bit of cheese between tortillas. Or just cheese if the girls are feeling finicky.

Either way they take only a few minutes to make and are a fun change from sandwiches.
When I want to get a bit fancier I turn to this terrific shrimp quesadillas recipe from Good Housekeeping. It’s quick, delicious and a great way to be meatless but still have the texture that most people expect with a meal. My girls gobbled this up!


Ingredients (serves 4)
* 1 pound(s) shelled and deveined shrimp, coarsely chopped
* 1/4 teaspoon(s) ground chipotle chile
* 2 limes
* 1 tablespoon(s) olive oil
* 1 large (8 to 10 ounces) red pepper, chopped (I omitted this)
* 1 medium (6 to 8 ounces) onion, chopped (I use chopped onion flakes, about 2T)
* 1 ripe avocado, mashed
* 1/2 cup(s) loosely packed fresh cilantro leaves, chopped (I use Gourmet Garden Cilantro Herb blend)
* Pepper
* 2 medium ripe tomatoes, chopped
* 1/2 serrano chile, seeded and finely chopped
* 8 (8-inch) soft-taco-size flour tortillas
* 8 ounce(s) shredded reduced-fat Mexican cheese blend
* 2 cup(s) shredded romaine lettuce


Directions
1. In small bowl, toss shrimp with chipotle chile. From limes, squeeze 4 tablespoons juice; set aside.

2. In nonstick 12-inch skillet, heat oil on medium one minute. Add red pepper and onion and cook 10 minutes or until tender, stirring frequently. Add shrimp and cook 3 minutes longer or until shrimp just turn opaque throughout. Transfer shrimp mixture to medium bowl and cover loosely with foil to keep warm. Remove pan from heat and wipe with paper towel.

3. Meanwhile, prepare guacamole: In small bowl, combine avocado with 2 tablespoons lime juice, half of cilantro, and 1/2 teaspoon freshly ground black pepper. Prepare tomato salsa: In another small bowl, combine tomatoes, serrano chile, 1/8 teaspoon freshly ground black pepper, and remaining lime juice.

4. Heat same skillet on medium-low 30 seconds. Place 1 tortilla in skillet. Sprinkle with one-fourth of shrimp mixture, one-fourth of cheese, and one-fourth of remaining cilantro; top with second tortilla, pressing lightly. Cook quesadilla about 2 minutes or until lightly toasted. Carefully turn quesadilla and cook 1 to 2 minutes longer or until cheese melts. Repeat to make 4 quesadillas in total.

5. Cut quesadillas into wedges; serve with guacamole, tomato salsa, and shredded romaine.

Another Meatless Recipe

I have friends who are vegetarian. Some consider seafood to be meat, some don’t. This recipe for Bean & Cheese Quesadillas from Family Circle is also quick, delicious and uses black beans for texture and protein.

Ingredients (serves 6)
* 1 tablespoon olive oil
* 1 small onion, finely chopped
* 1/2 small green pepper, seeded and chopped (I omit this)
* 1 can (15 ounces) black beans, drained and lightly mashed
* 1/2 cup salsa
* 1/2 teaspoon chili powder
* 1 package (10 count) fajita-size flour or whole-wheat tortillas
* 8 ounces reduced-fat pepper Jack cheese, shredded
* 1/2 cup cilantro leaves
* Extra salsa for serving (optional)

Directions
1. Heat oil in a large nonstick skillet over medium-high heat. Add onion and green pepper and cook for 4 minutes, stirring occasionally. Stir in beans, salsa and chili powder. Cook for 3 minutes, stirring occasionally.

2. Spray a large nonstick skillet with cooking spray. Place over medium-high heat. Place one tortilla in the skillet and cook for 1 minute. Spread 1/3 cup of the bean mixture and 1/3 cup of the cheese evenly over the tortilla. Sprinkle some of the cilantro over the top. Place another tortilla on top and cook 1 minute. Press gently with a spatula and turn. Cook for 1 minute or until browned.

3. Place quesadilla on a baking sheet and keep warm in 200° oven. Repeat with the remaining ingredients to make four additional quesadillas. Allow skillet to cool slightly if it becomes too hot.

4. To serve, cut each quesadilla into quarters. Serve 3 quarters to each person (there will be 2 leftover wedges)

Friday, May 13, 2011

Bug Party Ideas

Throwing a Bug Theme Party That Won't Make You Buggy!

I have girls, so a bug themed party doesn't seem like something they would appreciate, but when MomSelect offered me a chance to host a HEXBUG Nano party my girls were thrilled!

Buggy Fun!

First we planned a couple of buggy activities. Since our HEXBUG Nano were the super fun Easter Egg we colored and created Easter baskets. While the kids showed their artsy talents the adults hid eggs.

An alternate idea would be to buy small plastic bugs and bug nets. Have kids search you yard for the bugs. The winner gets a prize- maybe a bug house! (We can usually find all these items inexpensively at a local dollar store.)
After the bug search was over- and everyone had a HEXBUG egg and an equal number of regular eggs we played "Bug Run". If you've ever watched an ant you know that bugs don't follow a straight path. So I drew two bug trails in chalk on my driveway. Every few feet a circle would give an instruction- spin, jump, hop to the next circle- and at the end the HEXBUGS had their own race.


To play without HEXBUGS simply change the challenge at the end. Maybe worm eating (with gummy worms). Have kids dig the "worms" out of "dirt" (finely crushed Oreos make great dirt). The first to find and eat a worm is the winner.

Buggy Food!

Since our party was taking place at dinner time pizza was a given. I ordered kid friendly pizzas and added olives sliced in half as bugs. Because they were on top of the cheese they were easy to pick off.

We had Bug Juice to drink.


This very simple concoction looks best in a clear punch bowl as it can be a bit creepy to see "dead bugs" in the bottom!
Ingredients:

6 oz frozen lemonade concentrate, thawed
2 liters ginger ale
1 small container green sherbet

1 c raisins


Combine lemonade and ginger ale in punch bowl. Mix until lemonade dissolves.
When ready to serve add scoops of green sherbet to the bowl and place raisins on top to resemble bugs!


And for dessert- Dirt Cups!


This is a very easy dessert to make:
Ingredients:
3.9 oz Instant Chocolate Pudding
1 c cold milk
8 oz whipped topping
15 Oreo cookies, finely crushed
gummy worms
small cups

Mix pudding and milk in a large bowl and let stand for 5 minutes.
Stir in whipped topping and 1/2 of Oreo crumbs.
Spoon mixture into cups and refrigerate for one hour.
Before serving top cups with cookie crumbs and gummy worms.

If cake or cupcakes are more your style, use finely crushed Oreos to resemble dirt on top of the frosting. And if the cake is layered mix Oreo crumbs with the frosting in the center to resemble dirt- and don't forget to toss in a few worms- when you cut it you may just slice a worm in two! Oooh, gross!

Thanks to MomSelect and HEXBUG for giving every child at our party a limited edition HEXBUG Nano Easter Egg and the Spiral Starter Set for our game!

Creating a Meal with Tyson Grilled & Ready Chicken Breast

It's been a long time coming, but I am beginning to realize that I am busy. As in crazy busy. And when my family is otherwise occupied I need to be able to create a meal for myself quickly. Otherwise I find myself grabbing something from a convenience store that is 1) bad for me, 2) not really that tasty and 3) insanely expensive for what I am actually getting.

I try to prep food before hand but lately I've be
en running about on Sunday- my usual food-prep day. Recently I received a coupon to try the new Tyson® Grilled & Ready frozen chicken breast. The fact that it is fully cooked and takes only a couple minutes to heat in the microwave makes this my go-to meat for meals.

Since I mainly use leftovers and kitchen staples I am eating healthier and saving money!

Grilled Chicken Tacos

2 flour tortillas
1 cup Spanish rice
1/2 c lettuce
1
Tyson® Grilled & Ready frozen chicken breast
1/2 c shredded Cheddar
Salsa
Sour cream (optional)

Heat chicken breast, rice and tortillas. Layer as desired. Enjoy a quick and delicious meal!

Mexican Chicken Salad


Lettuce of choice
1 Tyson® Grilled & Ready frozen chicken breast
1/2 c Spanish rice
Salsa
Light ranch dressing
Shredded Cheddar

Heat chicken breast and rice. Layer salad. Mix salsa and ranch for a creamy yet spicy dressing. Enjoy an easy salad with a Mexican flair.

Chicken Pasta Salad

1 c spinach leaves
1/2 c tomato
1/2 c wheat pasta (cooked)
1
1 Tyson® Grilled & Ready frozen chicken breast
1 T extra virgin olive oil
1 T Balsamic vinegar
1 t Italian seasoning

Heat and chop chicken breast. Layer spinach, tomato, pasta and chicken breast in a bowl.
Mix EVOO & vinegar with Italian seasoning; toss with salad.
I usually put this in a divided container and tote it along when I know I won't make it home for dinner. It travels well and I'm not so tempted by the drive thru.

I received a coupon to try
Tyson® Grilled & Ready frozen chicken breast. Thoughts, photos and meals are my own.

Blueberry Buttermilk Pancakes

I prepare a “traditional” breakfast only on Sundays or holidays. I made these blueberry pancakes a couple weeks ago (because blueberries were on sale) and my family gobbled them up! I prefer to use fresh blueberries but you could use frozen- just be sure to thaw and rinse to avoid purple pancakes!

The recipe- from Everyday Food magazine- makes about 12-14 four inch pancakes.

Homemade Blueberry Pancakes


Ingredients
1 1/4 c all purpose flour- spooned and leveled
2 T light brown sugar
1 1/2 t baking powder
1/4 t baking soda
1/2 t coarse salt
1 c lowfat buttermilk (I didn’t have buttermilk so I used 1 c sour cream. You can also substitute plain yogurt)
1/2 c whole milk
2 large eggs
2 T unsalted butter, melted
1 1/2 c blueberries

Directions:

In a large bowl whisk together flour, sugar, baking powder, baking soda and salt. In another bowl whisk together buttermilk, milk, eggs and melted butter. Whisk milkmixture into flour mixture until just combined.

Heat skillet or griddle over medium heat. Grease hot skillet with butter (I use olive oil). Use 1/4 c batter for each pancake; spoon onto skillet and smooth to make round. Sprinkle with 2 T blueberries.

Cook until pancake has formed some bubbles and some have burst; 1-2 minutes. Flip and cook an additional 1-2 minutes. Serve immediately or place on a plate in a warm oven (about 200 degrees) while you cook the rest.

Serve with butter and maple syrup.

Friday, May 6, 2011

Banana Split Pancakes

A few weeks ago I made a banana split pancake recipe I found in George Duran's Take this Dish and Twist It. And while his banana split pancakes were unique they were way too sweet for my taste- and that's saying a lot!


So I took his idea and put my own twist on it - using far less chocolate, adding strawberries and mashing the bananas instead of slicing them.

These little beauties were delicious and my family can't wait to have them again!

I began with my favorite pancake recipe- with a few additions:

* 1-1/2 cups all-purpose flour
* 3 tablespoons granulated sugar
* 4 teaspoons baking powder
* 1/8 teaspoon salt
* 1 medium size ripe banana, mashed
* 2 eggs

* 1 cup milk
* 1/4 cup vegetable oil
* 1/3 c chocolate chips
* 1 lb. strawberries, fresh or frozen & thawed
* Whipped topping (if desired)

1. Heat a griddle or large pan to medium heat. Heat oven to warm (180°F) and place a foil-lined baking sheet inside. Only do this if you plan for everyone to eat together. In my house I serve the pancakes straight from the griddle.

1b. If using fresh strawberries:
Remove hulls from the strawberries and slice thin. Combine the strawberries with 2T sugar in large bowl. Set aside at room temperature to macerate (the strawberries will release their juices). After about 20 minutes mash half the berries with a potato masher to release more juice. Do not mash all of them. Set aside.

2. In a large bowl, whisk together flour, granulated sugar, baking powder & salt. Separate eggs and whisk egg yolks in small bowl with milk and oil.

3. With an electric mixer, beat egg whites to stiff peaks, about 1 minute. Stir milk mixture into flour mixture just until combined. Add mashed banana; stir until mixed. Fold in egg whites in two additions, until no white streaks remain. Very gently fold in chocolate chips.

4. Using a ladle, drop 1/4 cup batter onto heated griddle. Repeat, spacing at least 1 inch apart. Cook 1 minute, or until bubbles in batter pop and remain open. Carefully flip pancakes and cook an additional 30 seconds to 1 minute.

Stack pancakes 3 or 4 high, top with strawberries and juice and a bit of whipped topping, if desired. Serve and enjoy the rounds of applause.


Friday, April 29, 2011

Brownie Sundae Cheesecake

I made this recipe from Hershey’s Kitchens for a family celebration. It’s a longer process than most cheesecakes as you first bake the brownies that are then poked into the creamy cheesecake before it is baked. But Oh My Gosh! YUMMY! There was not a bite of this left.


One thing I noticed about this cheesecake in comparison to other cheesecakes I’ve made… This one was super creamy and very springy. I’m not sure how else to describe the texture; you’ll have to make it yourself to understand what I mean.

Brownie Sundae Cheesecake


Directions:
1) Make your favorite brownie recipe – or use the one below.

1/2 cup (1 stick) butter or margarine, melted
1 cup sugar
1 teaspoon vanilla extract
2 eggs
1/2 cup all-purpose flour
1/3 cup Cocoa
1/4 teaspoon baking powder
1/4 teaspoon salt

Heat oven to 350°F. Grease 8 or 9-inch square baking pan. Stir together butter, sugar and vanilla in bowl. Add eggs; beat well with spoon. Stir together flour, cocoa, baking powder and salt; gradually add to egg mixture, beating until well blended. Spread batter in prepared pan.

Bake 20 to 25 minutes or until brownies begin to pull away from sides of pan. Cool completely in pan on wire rack.

Cut 1 cup of 3/4 inch pieces. (Ah! Snacking brownies left over!)

2) Heat oven to 350°F. Prepare CHOCOLATE CRUMB CRUST, below.

Combine 1-1/2 cups (about 45 wafers) vanilla wafer crumbs, 6 tablespoons powdered sugar, 6 tablespoons HERSHEY’S Cocoa and 6 tablespoons butter or margarine (melted). Press crumb mixture onto bottom and 1/2 to 1 inch up side of 9-inch springform pan. Bake 8 minutes; cool slightly.

Ingredients for the cheesecake:
4 packages (8 oz. each) cream cheese, softened
1 cup sugar
1-1/2 teaspoons vanilla extract
4 eggs
1/4 cup REESE’S Chocolate Peanut Butter Topping (note: I could not find the chocolate peanut butter topping. I melted 1/4c fondue chocolate- both Hershey’s and Baker’s make this- with 2T peanut butter in the microwave for 30 seconds or so)

3) Beat cream cheese, sugar and vanilla until smooth. Gradually add eggs, beating well after each addition. Pour batter into prepared crust.

4) Sprinkle brownie pieces over cheesecake surface; push pieces into batter. Drop topping by teaspoonfuls onto surface of cheesecake. With knife or metal spatula, swirl gently through batter for marbled effect. Bake 50 to 55 minutes or until almost set. Remove from oven to wire rack. With knife, loosen cake from side of pan; cool.*

* I prefer to cool my cheesecake completely and refrigerate it before removing the springform pan. This is, of course, personal preference. I find it is easier to remove the pan after the cheesecake is chilled.

Monday, April 25, 2011

Freschetta - By the Slice

I usually have two main gripes about microwave pizza:

  1. Where is the cheese? Honestly, you would think there was a shortage the way so many companies skimp on the cheese.
  2. What's up with the crust? If the crust is thick it's too doughy and chewy; if it's thin it's like eating a cracker.
So when Freschetta asked me to try their new Freschetta by the Slice I will honestly say I wasn't too eager. I shouldn't have been so skeptical.


The first thing you notice about Freschetta by the Slice is that it is actually a slice, cut from a whole pizza. The second thing you notice is that the cooking- though it is in the microwave- requires a bit more than just putting it in the microwave and setting the time.

You begin by placing the cooking tray near the edge of the turntable and cook for 60 seconds. Then you move the cooking tray to the center of the turntable and cook for another 90 seconds. Now whether it's the cooking tray or the cooking times, I can't say, but the crust was almost perfect. It was crisp on the bottom and soft on the top. Very impressive for a microwave pizza

Now lets talk about the cheese...


There is a lot of it. And it didn't have that funny processed cheese texture that so many microwave pizzas have. Nice.

I had the Spinach & Mushroom and found the toppings to be plentiful and large enough that you could actually tell what they were.

I think Freschetta by the Slice is a terrific single serve pizza option; one that won't leave you wishing you had eaten leftovers.

Freschetta by the Slice is also available in BBQ Recipe Chicken, Vegetable Medley and Six Cheese Medley.

Want to Try Freschetta by the Slice?

Simply leave a comment telling me which flavor you think sounds best. I will draw one winner, randomly, on Friday April 29. The winner will receive a coupon for a complimentary Freschetta by the Slice pizza and a 3 piece Freschetta storage set (6 piece version shown below). The storage set is awesome- the lids lock down securely and can be used in the refrigerator/ freezer, microwave and dishwasher.
Disclosure: Freschetta provided a coupon for a complimentary Freschetta by the Slice as well as the 6 piece storage set. All thoughts and images are my own.

Friday, April 15, 2011

Buttery Dinner Rolls

I’ve never been able to make a pretty dinner roll. I can remember my mom making rolls; perfectly round and golden. When I try they look lumpy and ugly (though they taste fine). I made this recipe at Thanksgiving and, for the first time, served beautiful rolls. We're making them again for Easter dinner!

Brenna helped me make these as it involved rolling the dough into balls. Fun!
The recipe came from the April 2009 Cuisine at Home magazine.

Buttery Dinner Rolls


Recipe makes 12 rolls. Warning: this is time consuming! Takes about 4 hours; 3 1/2 of it is rising time.

Ingredients
2/3 c whole milk
1/2 stick unsalted butter, diced
1/4 c sugar
1 pkg active dry yeast (2 1/4 tsp)
2 T unsalted butter, softened
3 c all-purpose flour
1 t table salt
1 egg, beaten
1 egg yolk, beaten

Directions
Heat milk in a small saucepan to 180° over mdium heat. Add 1/2 stick butter and sugar; stir to dissolve sugar. Cool mixture to 110°. Stir in yeast. Let rest in a warm place until it swells and becomes bubbly; about 10 minutes.

Grease inside of a bowl and a muffin tin with 2 T softened butter.

Whisk together flour and salt in the bowl of a stand mixer. Add yeast mixture, egg and egg yolk.
Knead mixture with a dough hook on medium speed until dough forms a ball and pulls away from the bowl; about 6-8 minutes. Add 1 T flour at a time if necessary. Place dough in buttered bowl and let rise until doubled in size; about 2 hours.

Divide dough into 36 equal portions. Shape portions into balls; place 3 each into each well of muffin tin. Cover dough with plastic wrap. (Dough may be refrigerated overnight at this point.) Let rise until doubled in size; about 1 1/2 hours (2 1/2 hours if dough was chilled).

Preheat oven to 375° with rack in lower third of oven.

Bake rolls until light brown; about 10 minutes. Cool slightly in pan before removing.

Handy tip: my kitchen tends to be cool. I heat my oven on a low setting while I mix the dough and turn it off when it becomes warm. I place my dough, covered, in here to rise. Don’t make the oven too warm.

Blogger template 'Pinki' by Ourblogtemplates.com 2008

Jump to TOP

ss_blog_claim=cc9e1d94f6274b95f747d51cccacf62a